First posted on the West Dean College of Arts and Conservation blog

Assessment
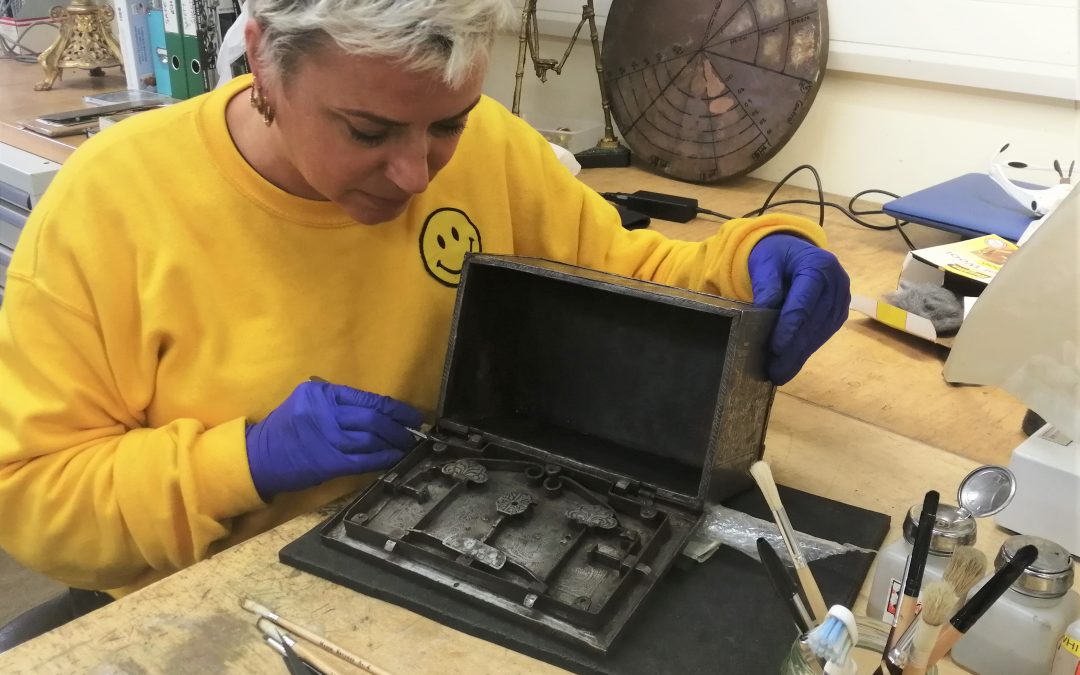
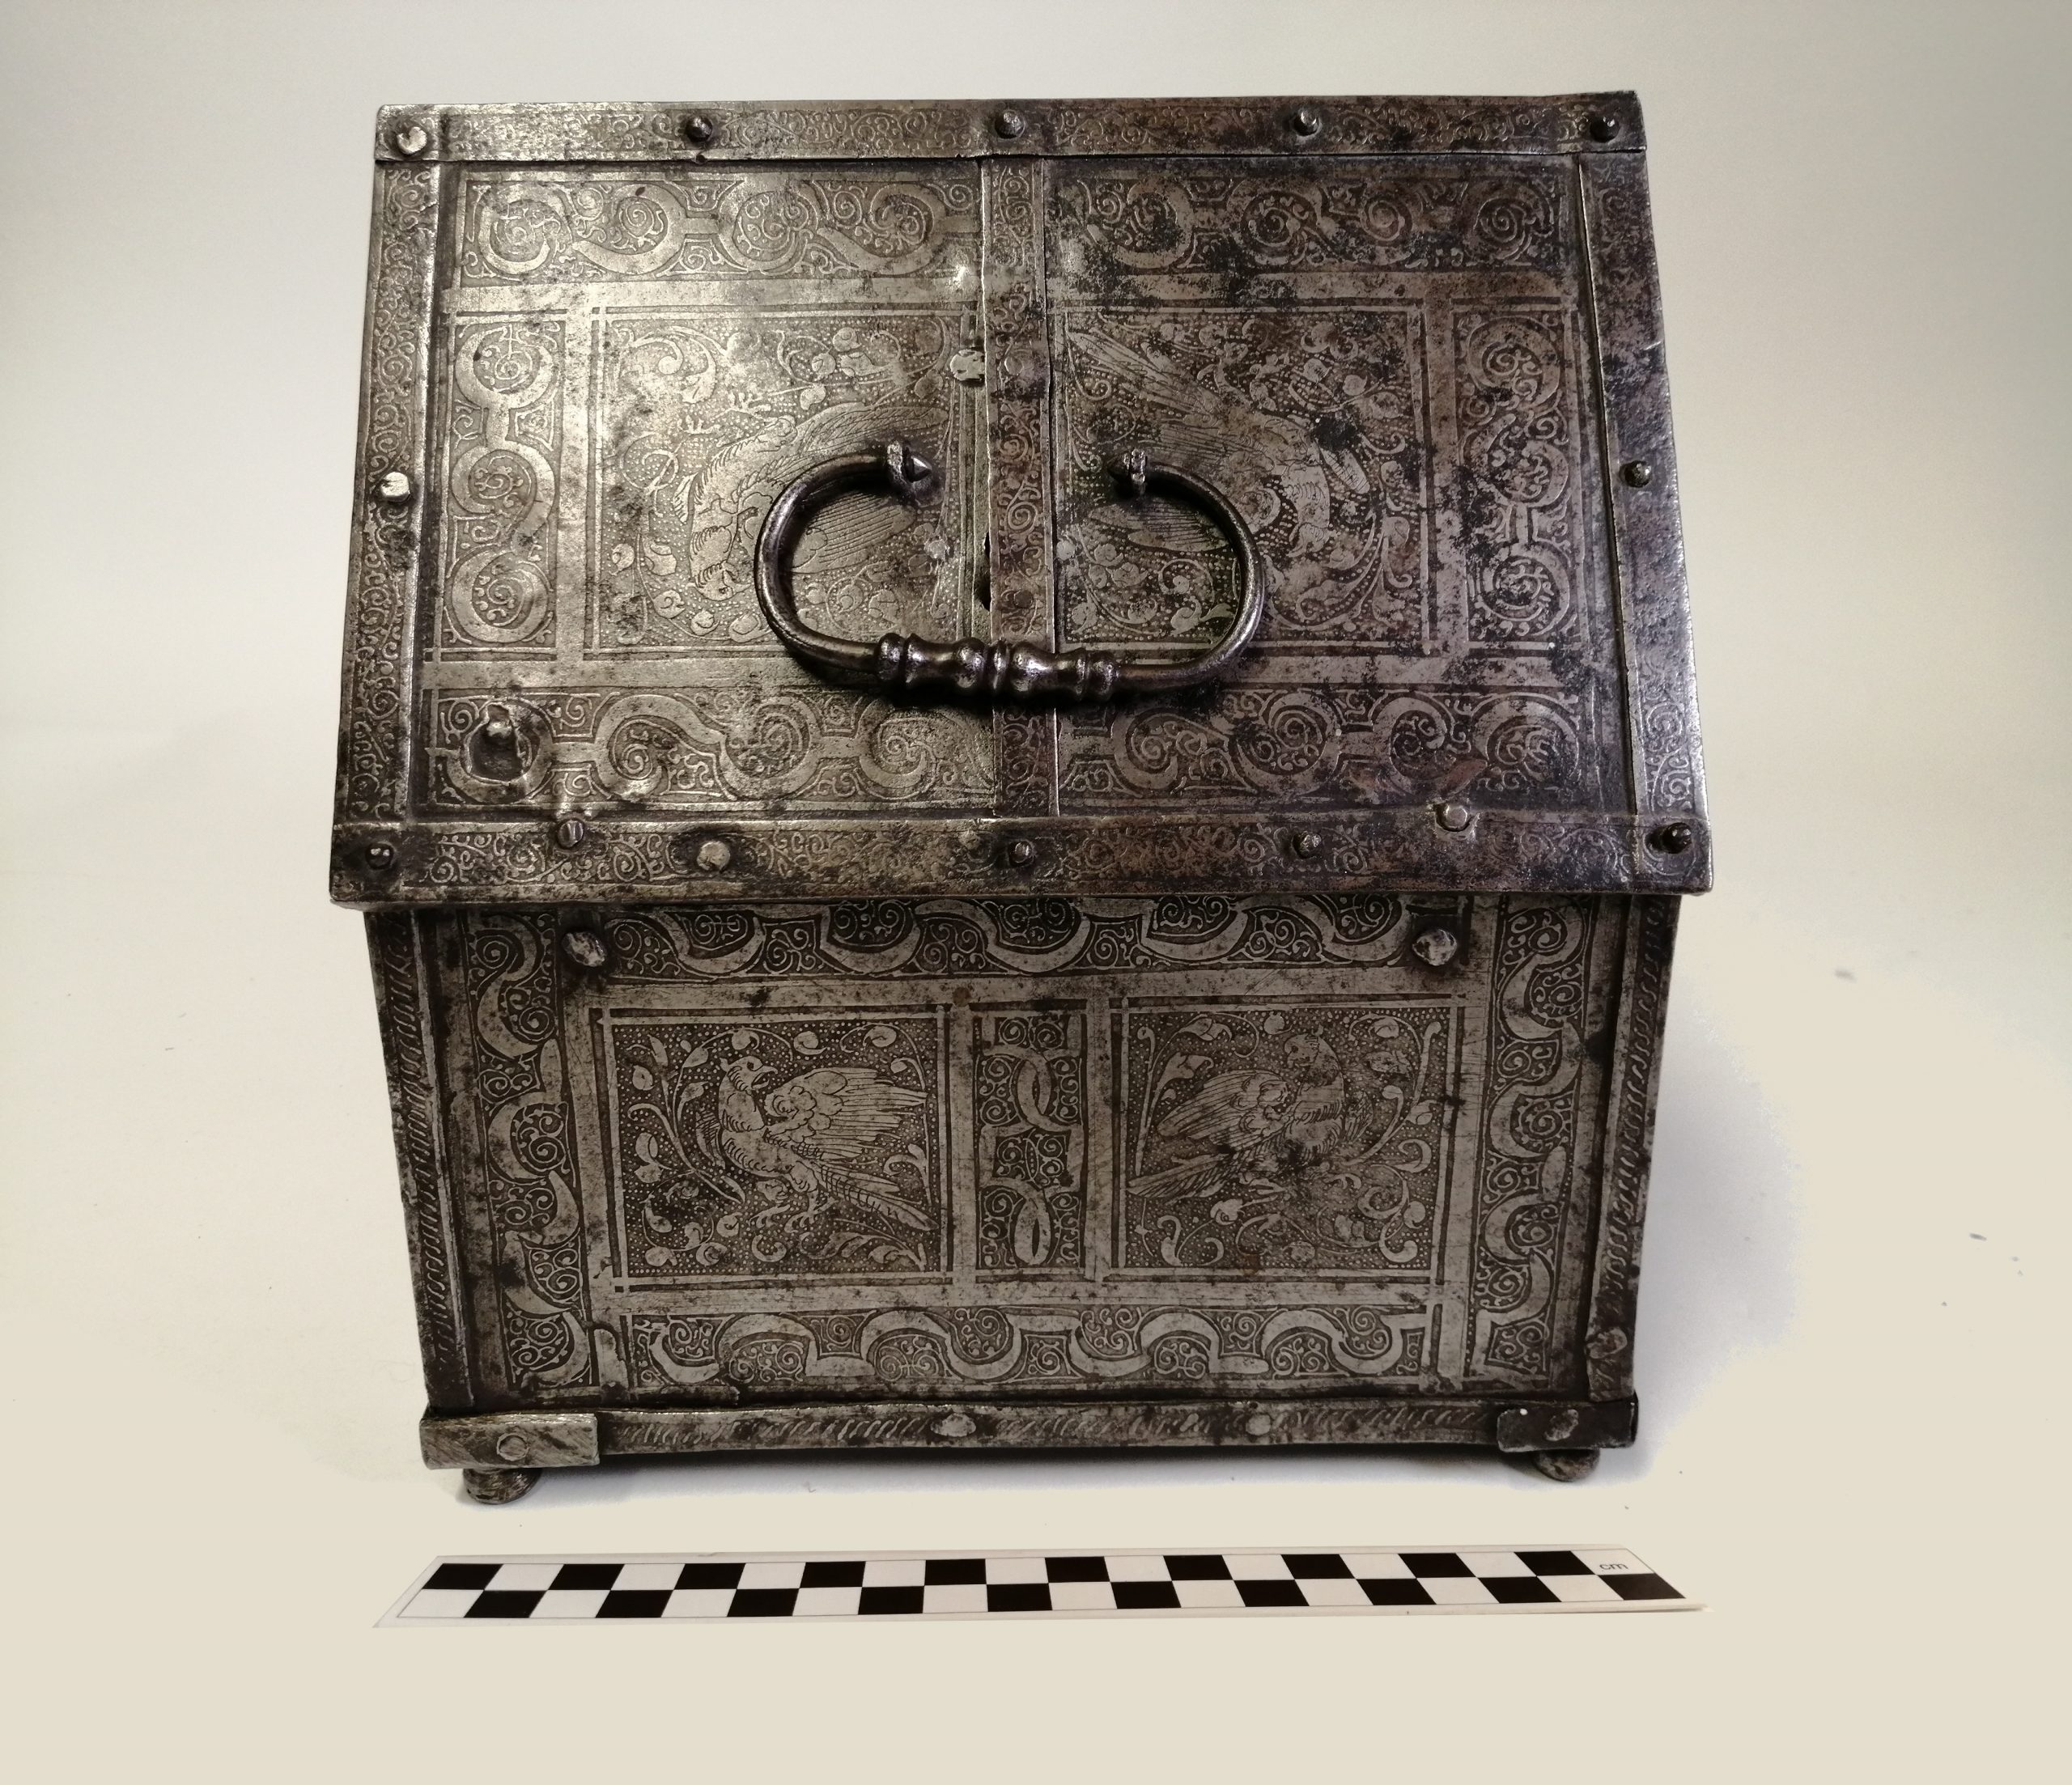
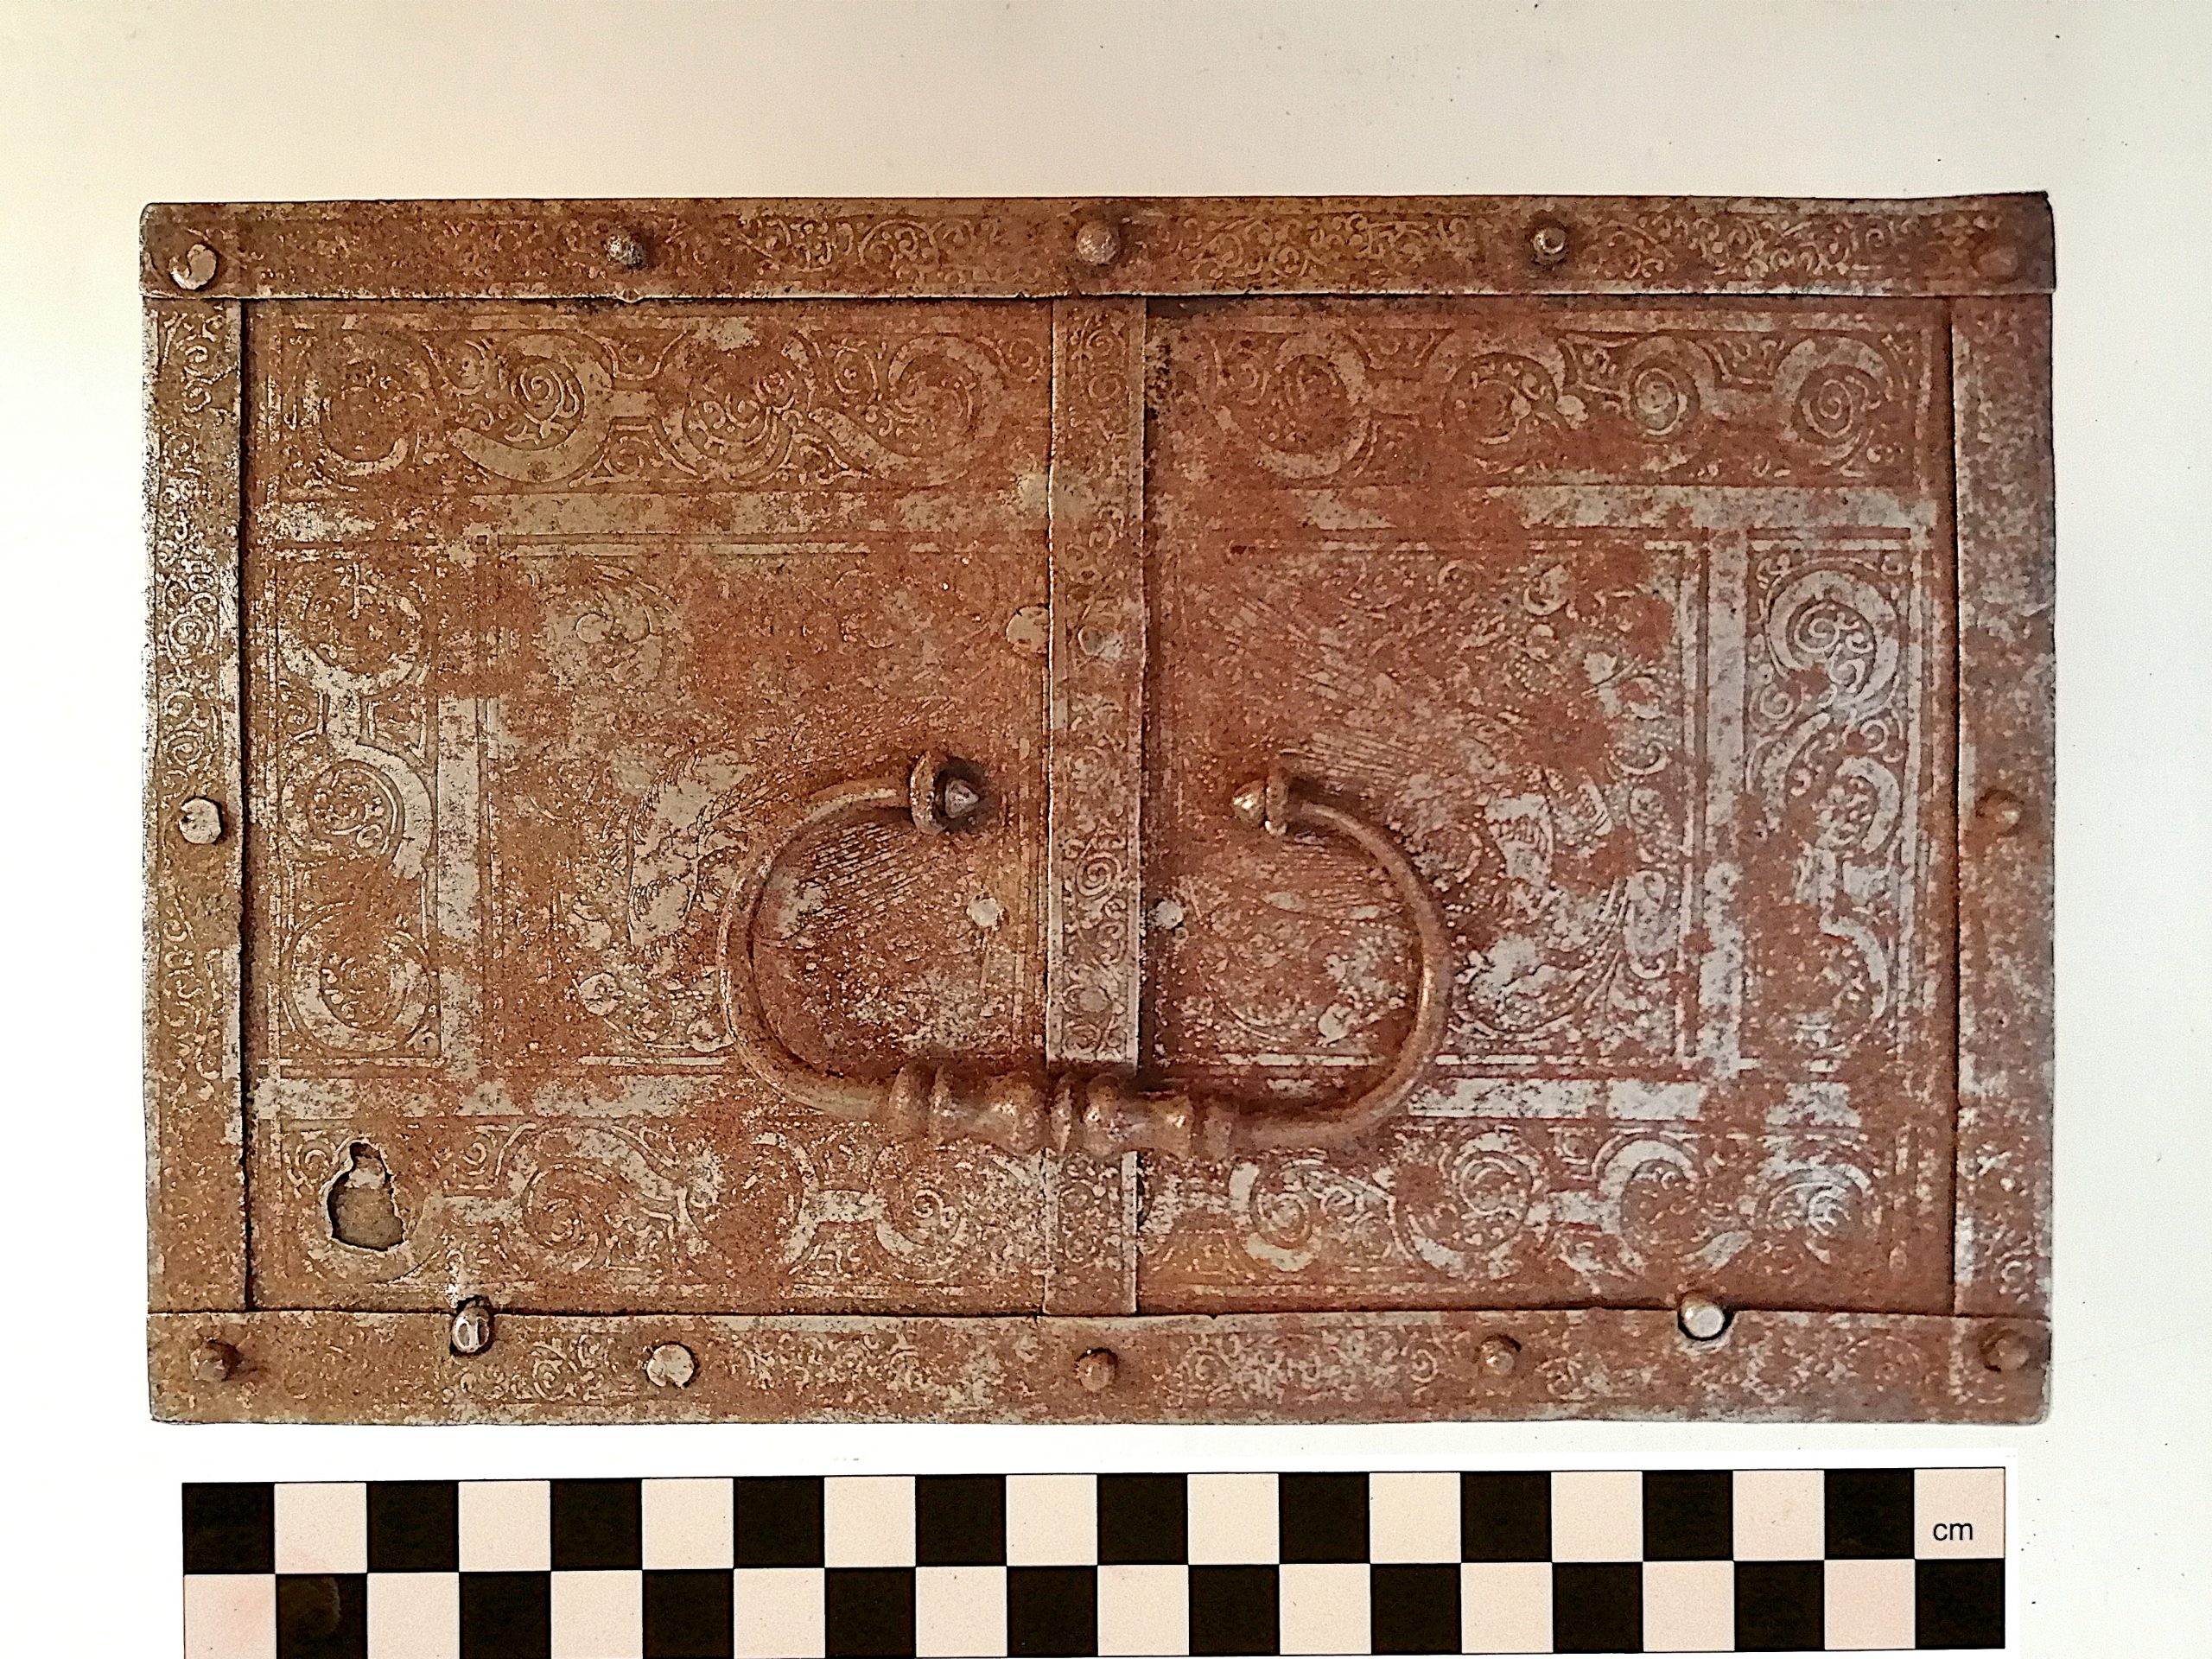
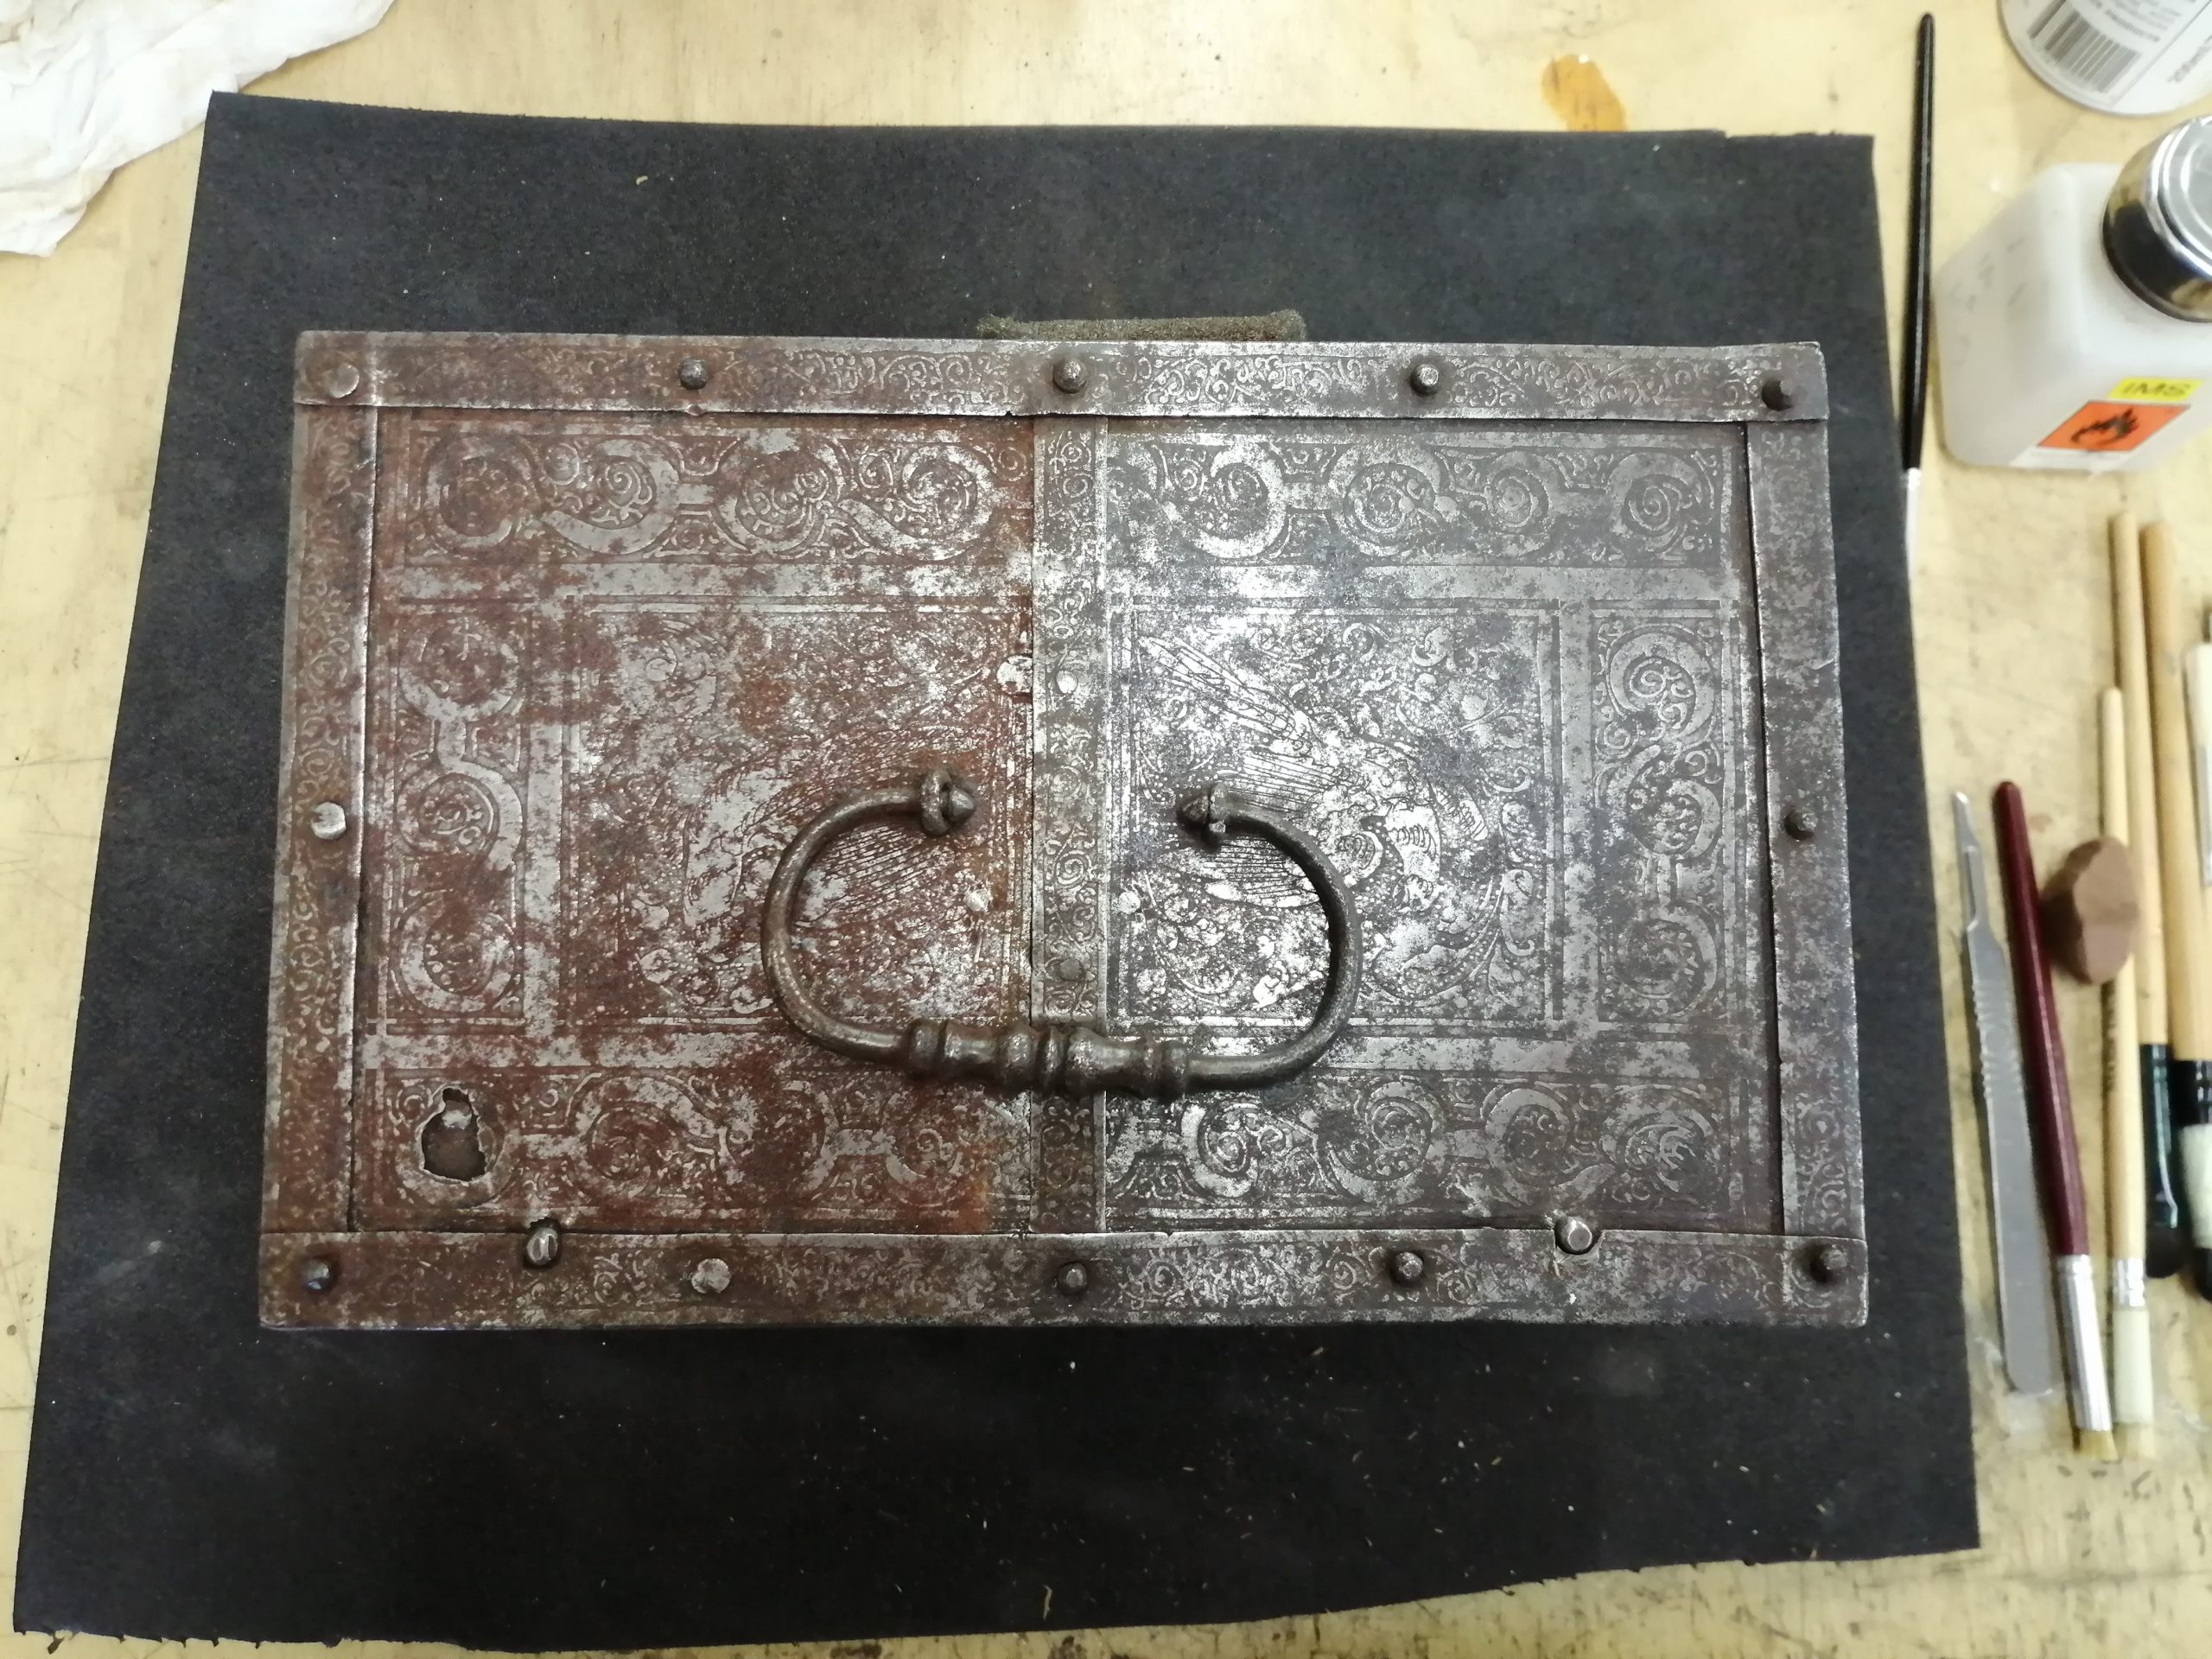
I was fortunate enough to treat this beautiful iron casket whilst studying at West Dean College in 2019. It needed some attention and was brought in by Clocks tutor Tim Hughes. (fig 1 and 2) I had seen a similar casket in the V&A and discovered that these are called Iron or Nuremburg iron caskets and were produced circa 1600. Following an unfortunate event, the casket had been exposed to water, and had developed a coating of rust, so the aim was to return it to its condition before the exposure to water. (fig 3)
Prior to my studies on the GD conservation of Metalwork, I had no experience with materials science, so I found the science modules extremely interesting. They revealed a language which helps to explain treatments and materials, giving a greater understanding of processes such as corrosion, patination, embrittlement, and the daily challenges which face metal conservators. The lab at West Dean has an XRF (X-ray fluorescence) machine and an FTIR (Fourier-transform infrared) spectrometer, which help to analyse the objects we work with. The XRF machine uses X- rays to determine the elemental composition of an object, and the FTIR spectroscopy analysis helps to identify compounds such as fillers and coatings.
So, I took this opportunity to carry out some analytical tests, which would help not only to decide on treatments, but would familiarise me with the equipment – and provide an extremely interesting and enjoyable extension of the project!
Analysis
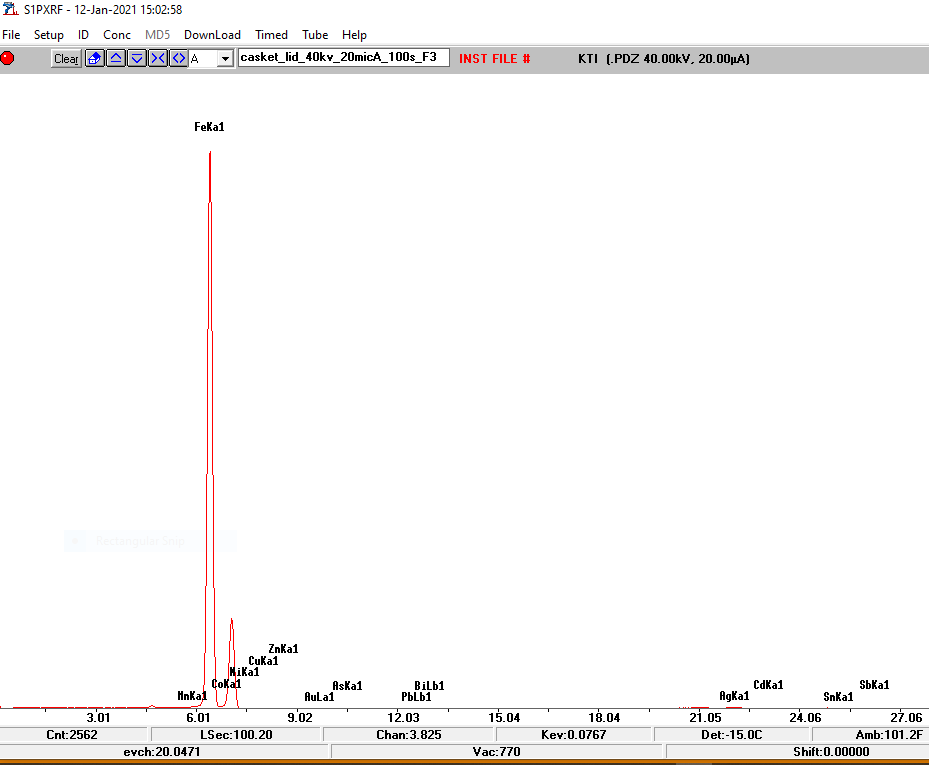
The first step was to ascertain the metal from which the casket was made. For this I used the XRF machine on each exterior panel, and the test revealed a very high iron reading, showing that the casket was indeed constructed from iron or steel. (Fig 4)
The interior of the casket was mainly bare oxidised metal, showing remains of a dark red coating in places, and it was suggested that this might be lead paint. If this were true, precautions would need to be taken, however an XRF reading of the area showed no lead, leading me to conclude that the coating may be a wax.
In order to analyse this substance, a small sample was prepared for the FTIR spectrometer, and the results were compared to examples in the IRUG online database, showing that the substance was a natural wax. This could have been added as a protective coating at some point in the casket’s history but was now considerably degraded.
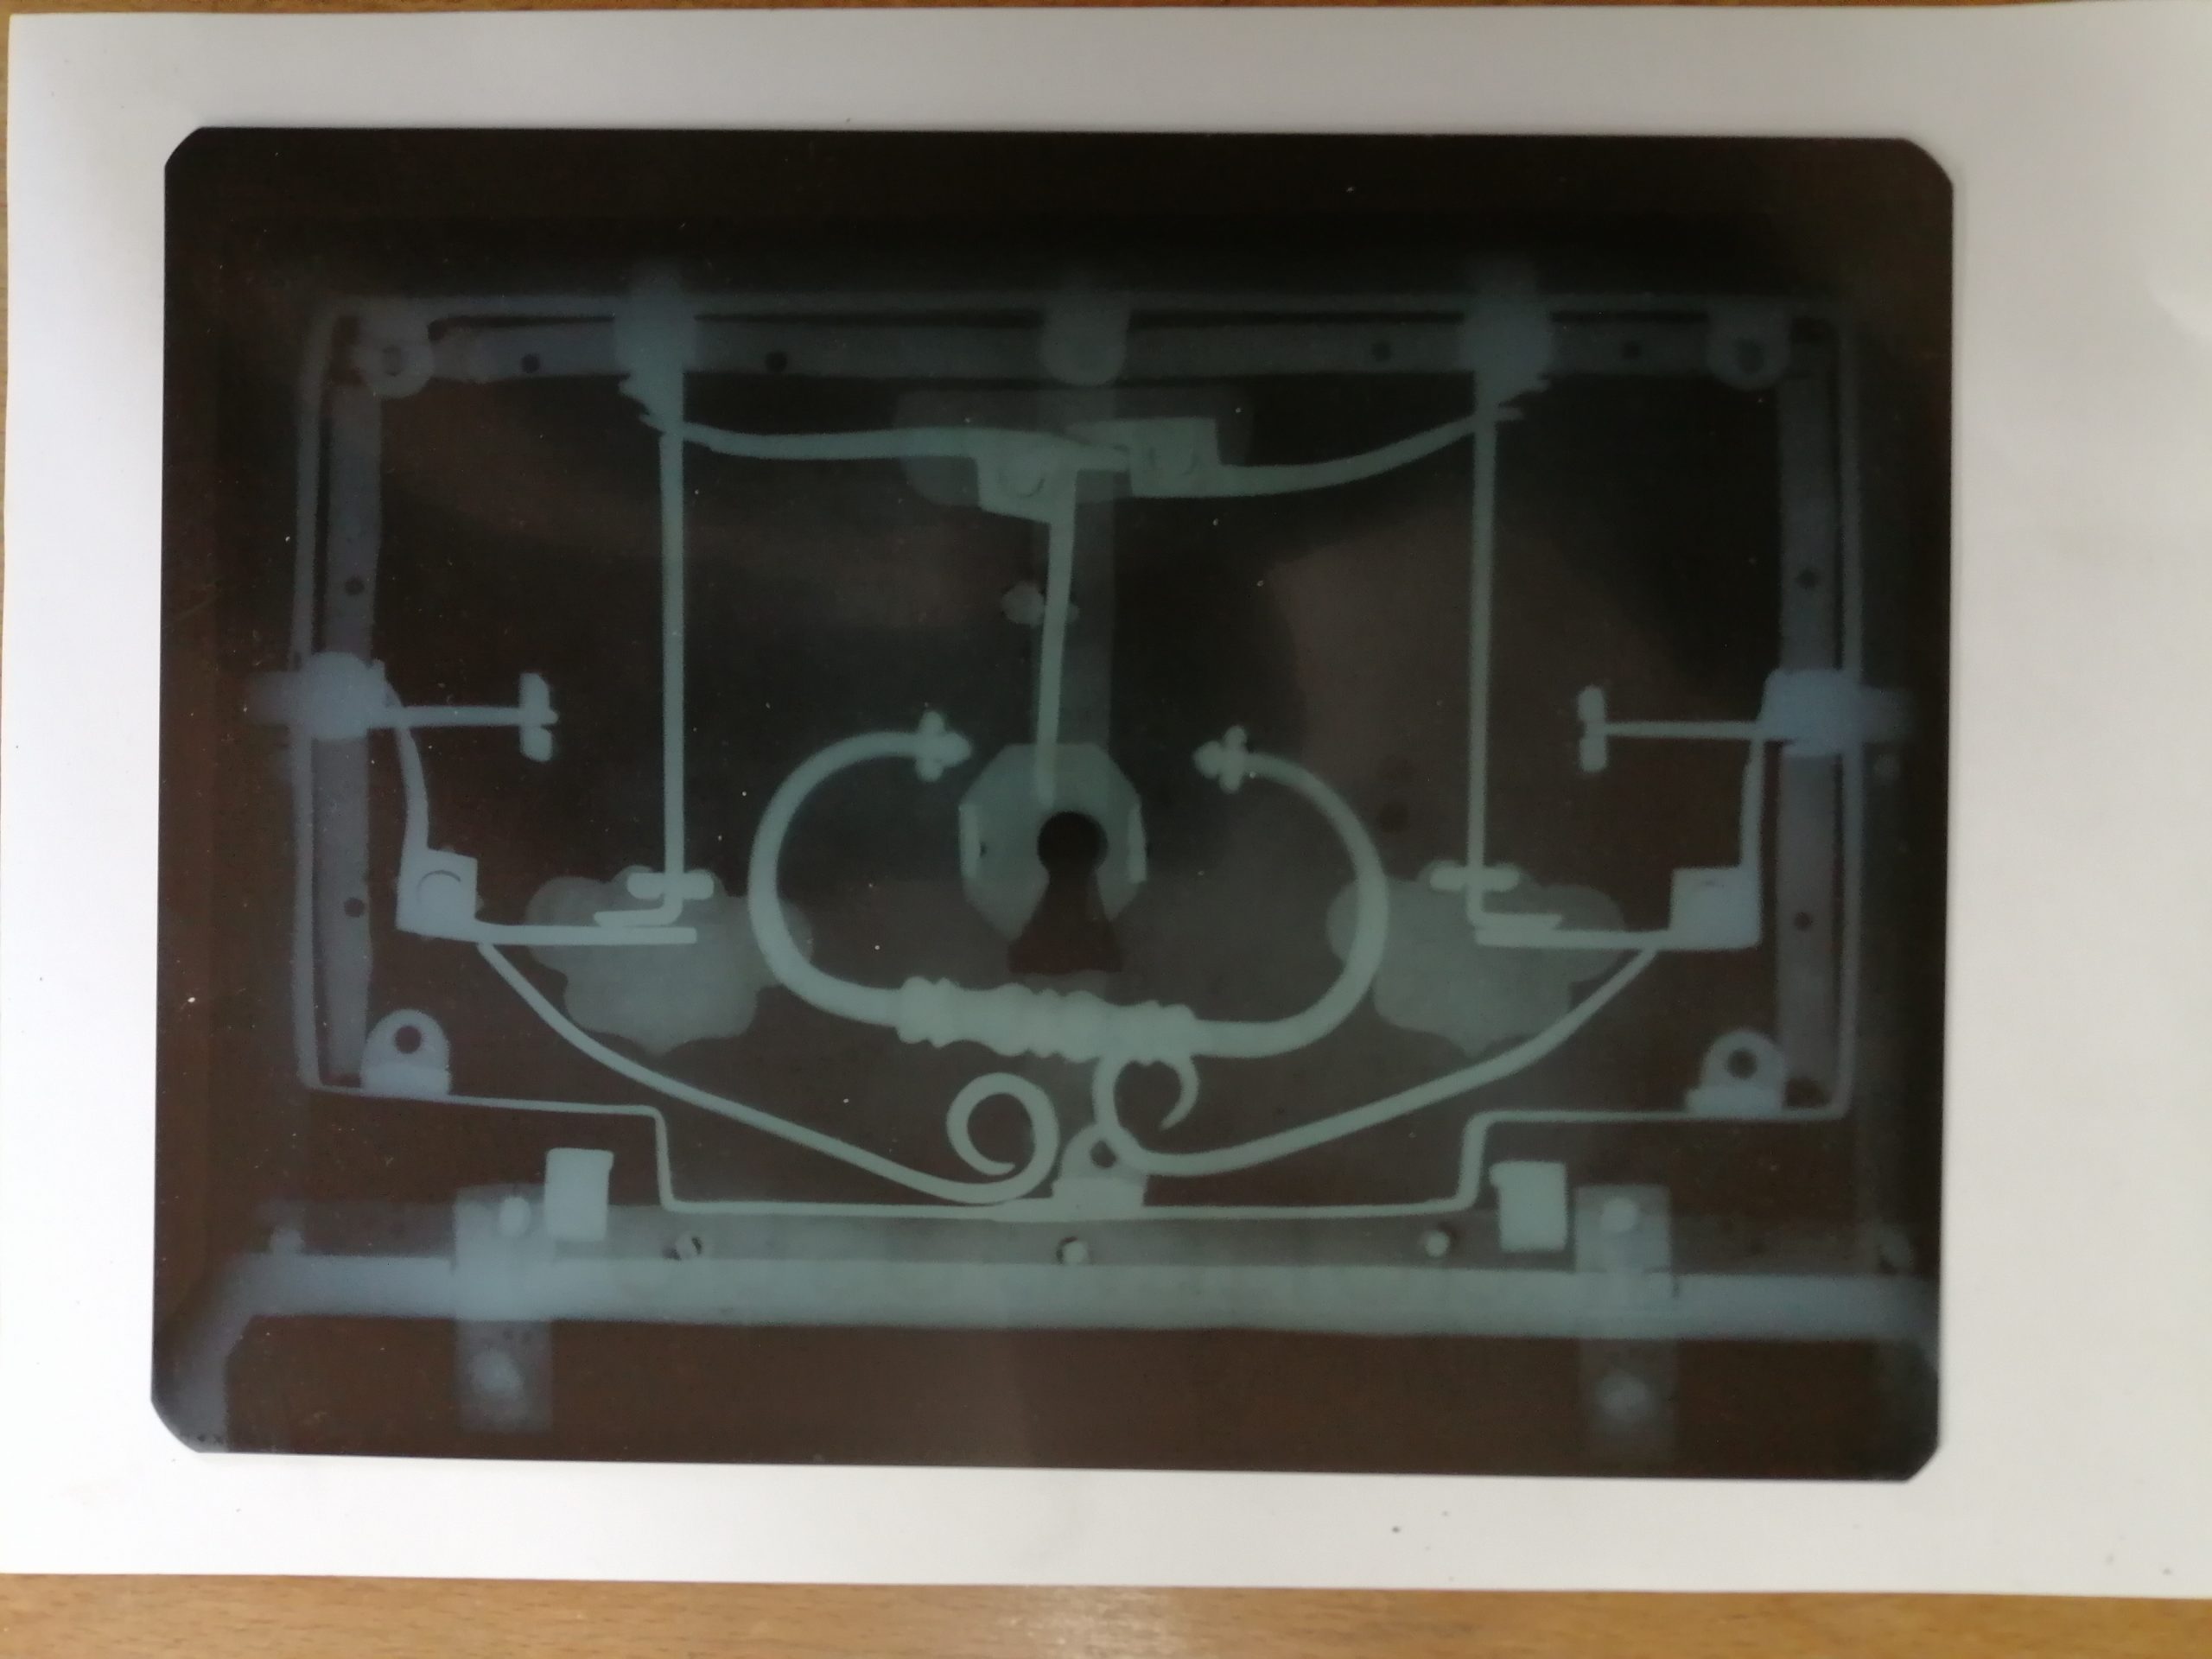
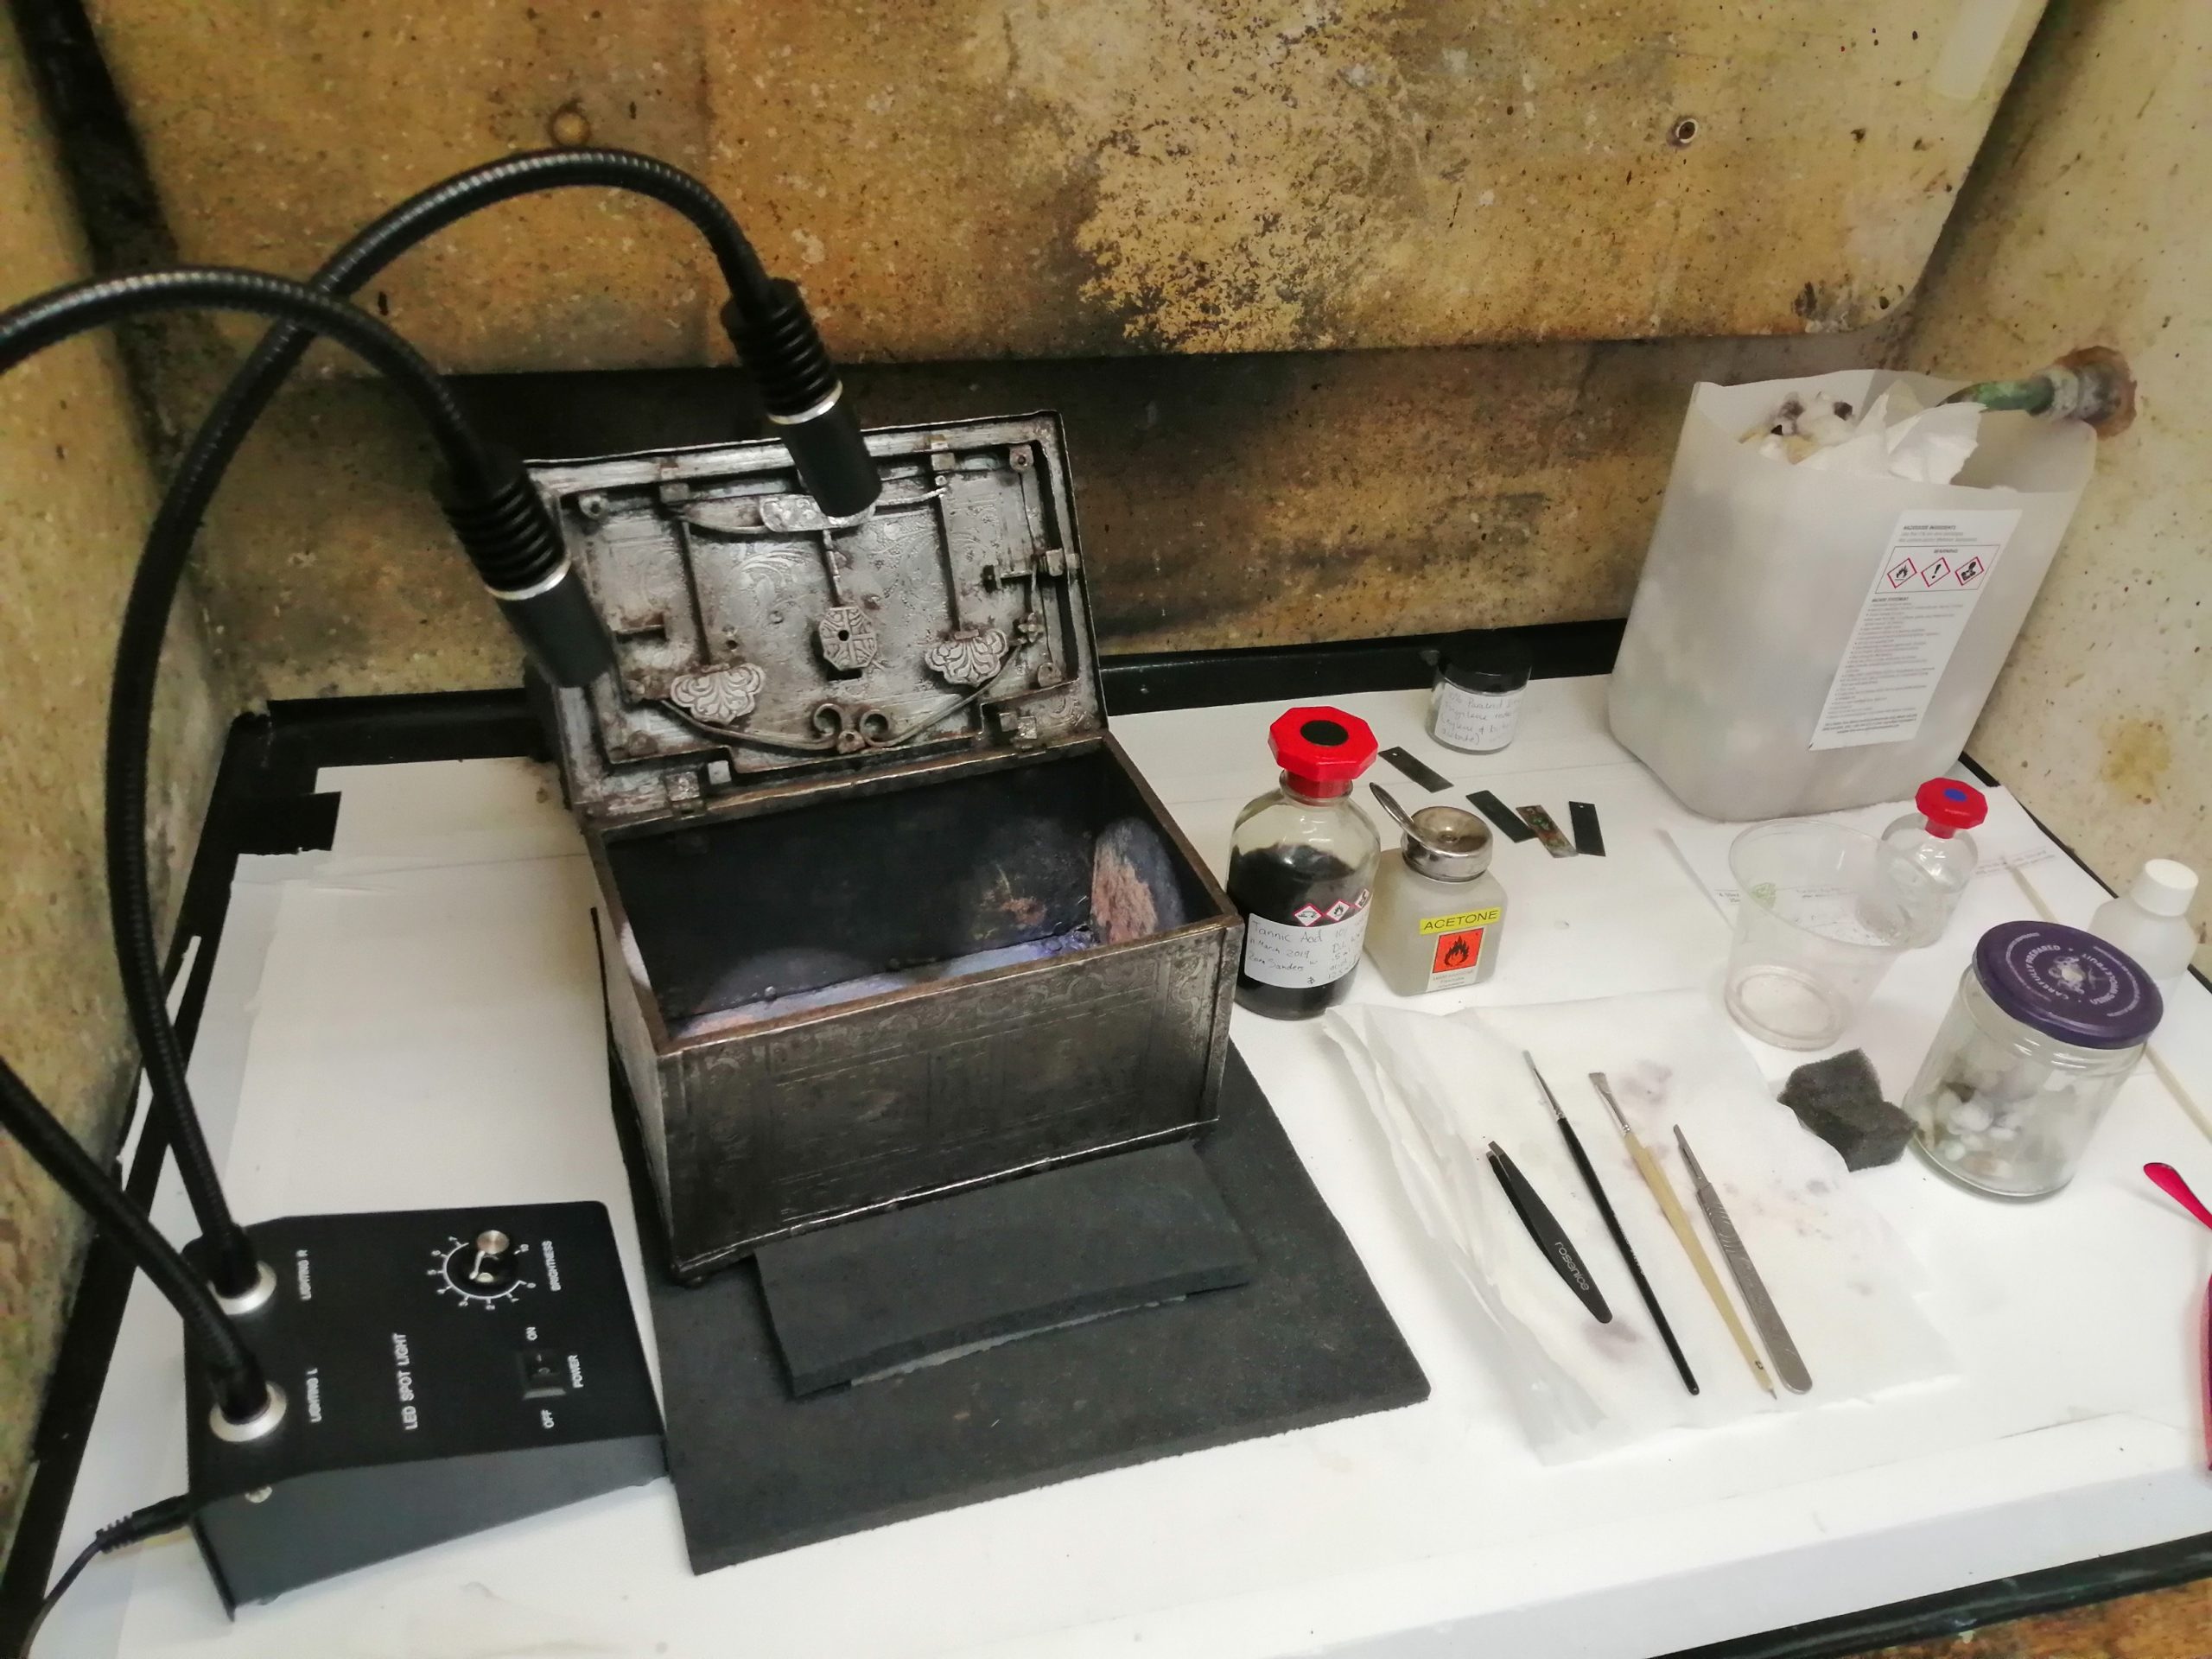
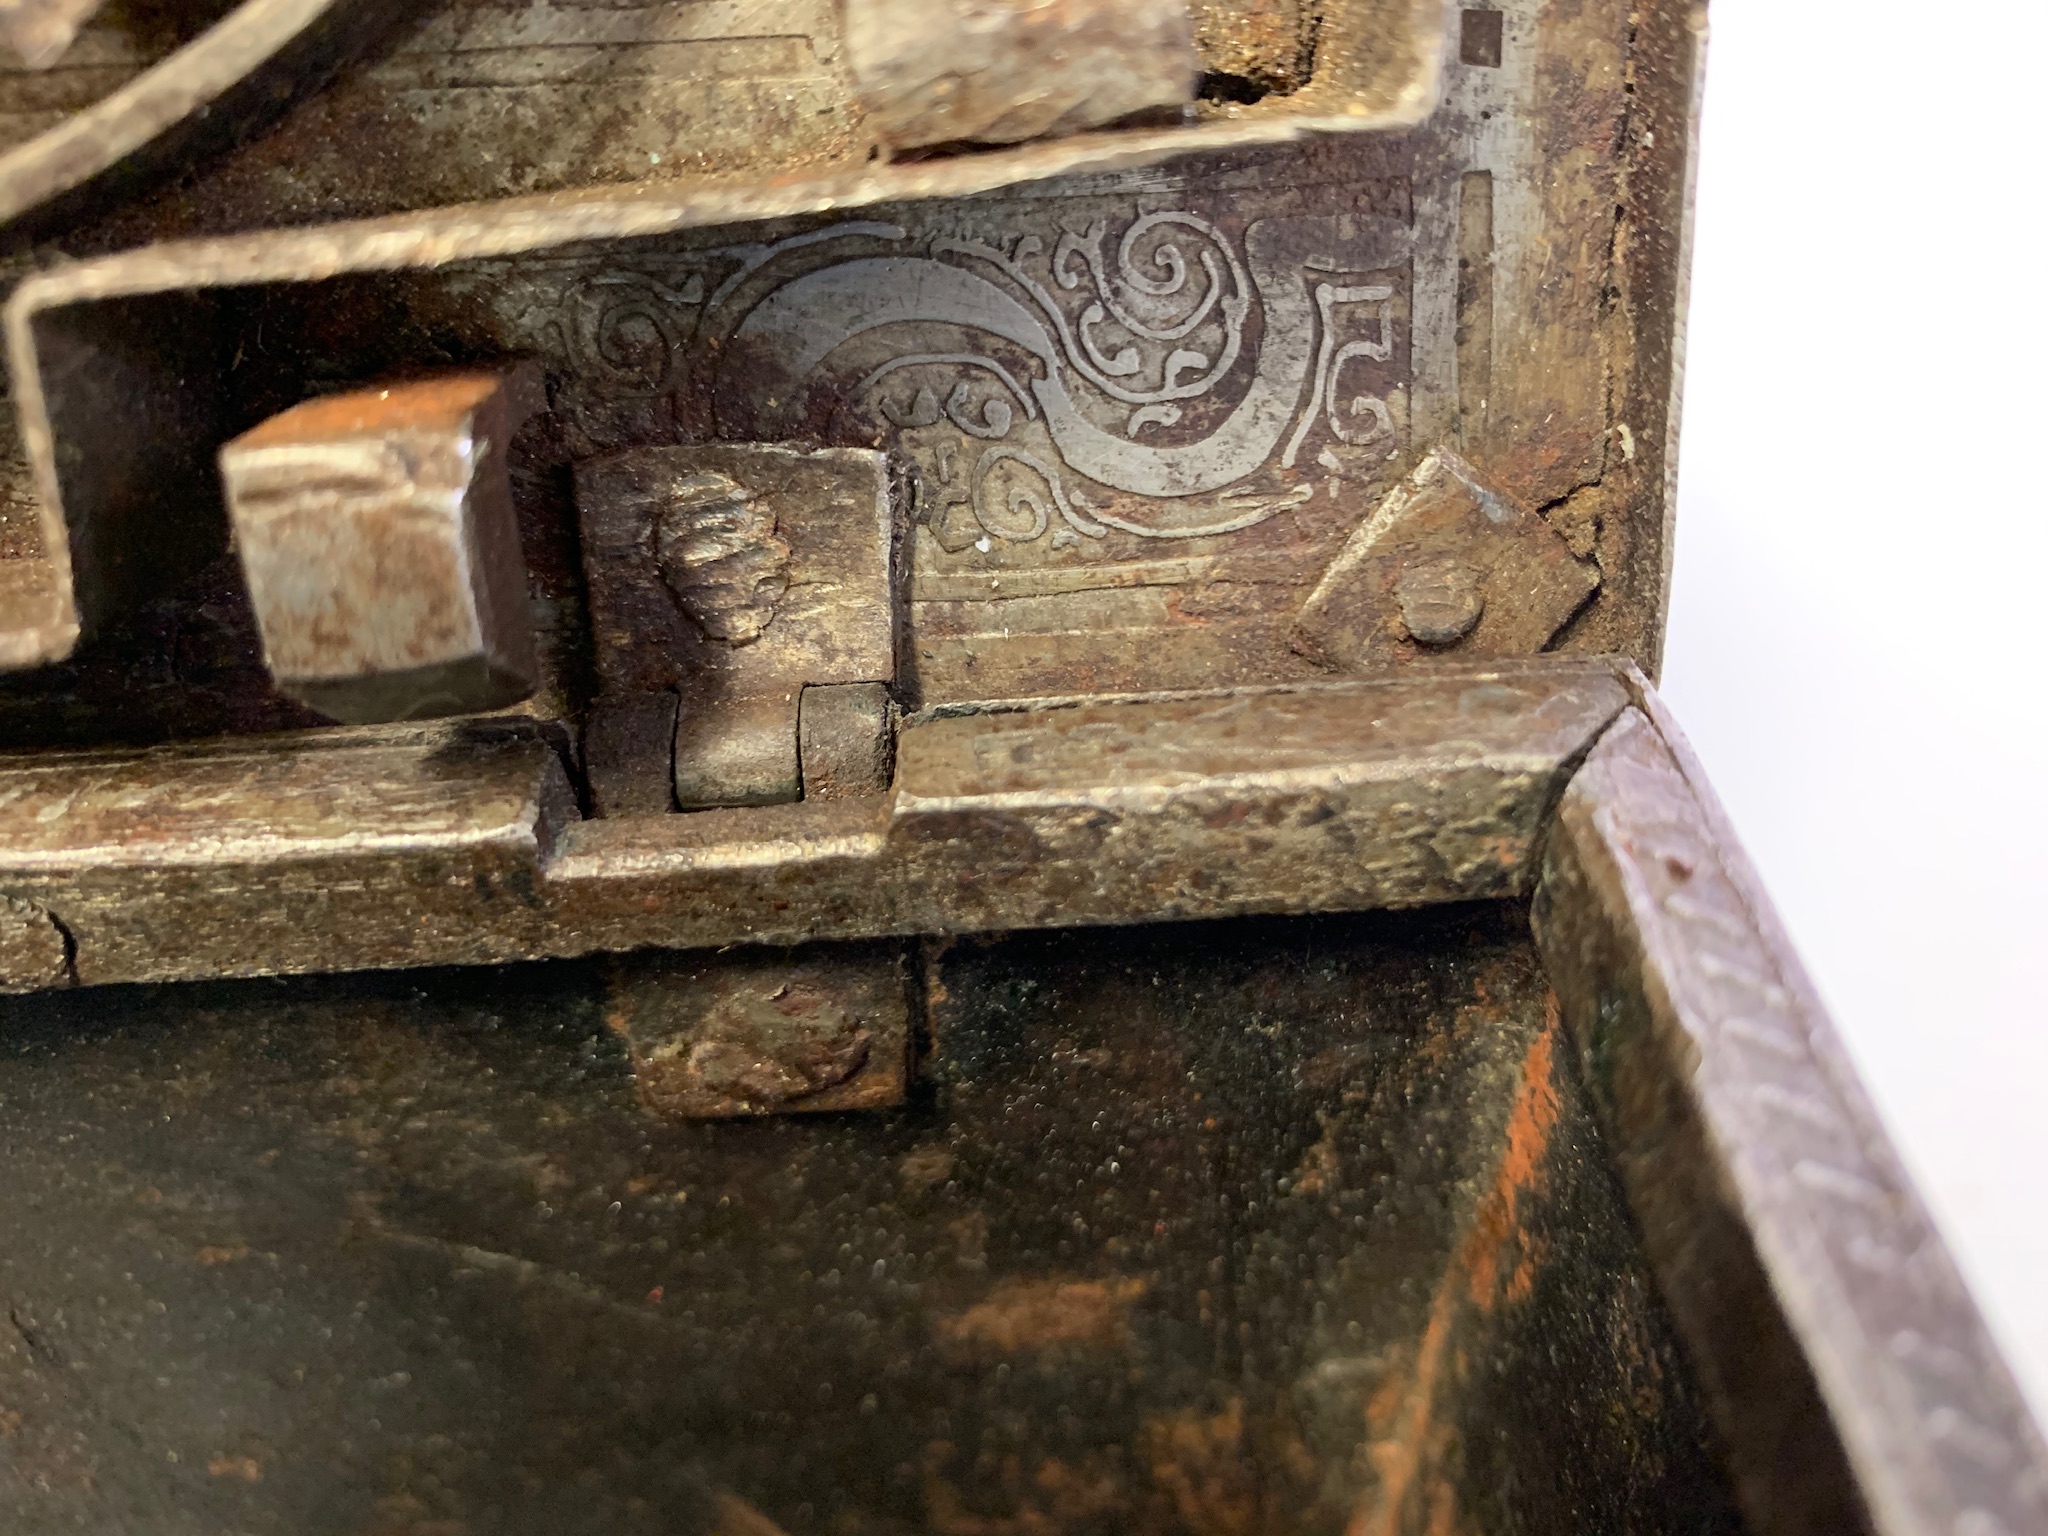
Finally, the client had requested that the locking mechanism in the lid should be cleaned in order that it could be used, so I took the casket to the conservation department at Fishbourne Roman Palace which has an X-ray photography machine. This technique enabled me to see some hidden parts of the locking mechanism, which would help with the cleaning process. (Fig 5.)
The Importance of Testing
Luckily, I was able to compare the casket with photographs taken from before the exposure to water. This was especially useful in helping to determine the extent of the new damage, and how far the treatment should be taken.
Before treatment of the casket, I carried out some chemical tests on steel tokens, using both citric acid, and acetic acid in 20% w/v with de-ionised water solutions. The tokens were submerged for 5h before any reaction could be seen, however I decided not to use this method as the removal of the corrosion was not even. I also carried out similar tests using Biox Conservation LiquidTM and EvaporustTM but judged these to be too harsh and as before, the result was uneven. In both cases it would require the casket to be submerged, and would risk damage to the wax coating on the interior of the casket.
As a result of the tests, I decided to go forward with mechanical cleaning, which is more controllable and localised, allowing for the variations in damage. I began the treatment on an interior panel which had been removed prior to damage, leaving it exposed to water. (Fig 6)
I used a stiff bristle brush to remove the loose rust flakes, then IMS (industrial methylated spirits) and a bristle brush to dislodge the remaining orange powder.
Once most of the new rust had been removed, I could see that it had formed mainly on old areas of black corrosion which had developed at some point in the object’s past. These areas had now become more textured, so were gently rubbed with GarryflexTM fine abrasive eraser (240 grit) to return the surface to its previous texture without removing the old black inactive corrosion layer.
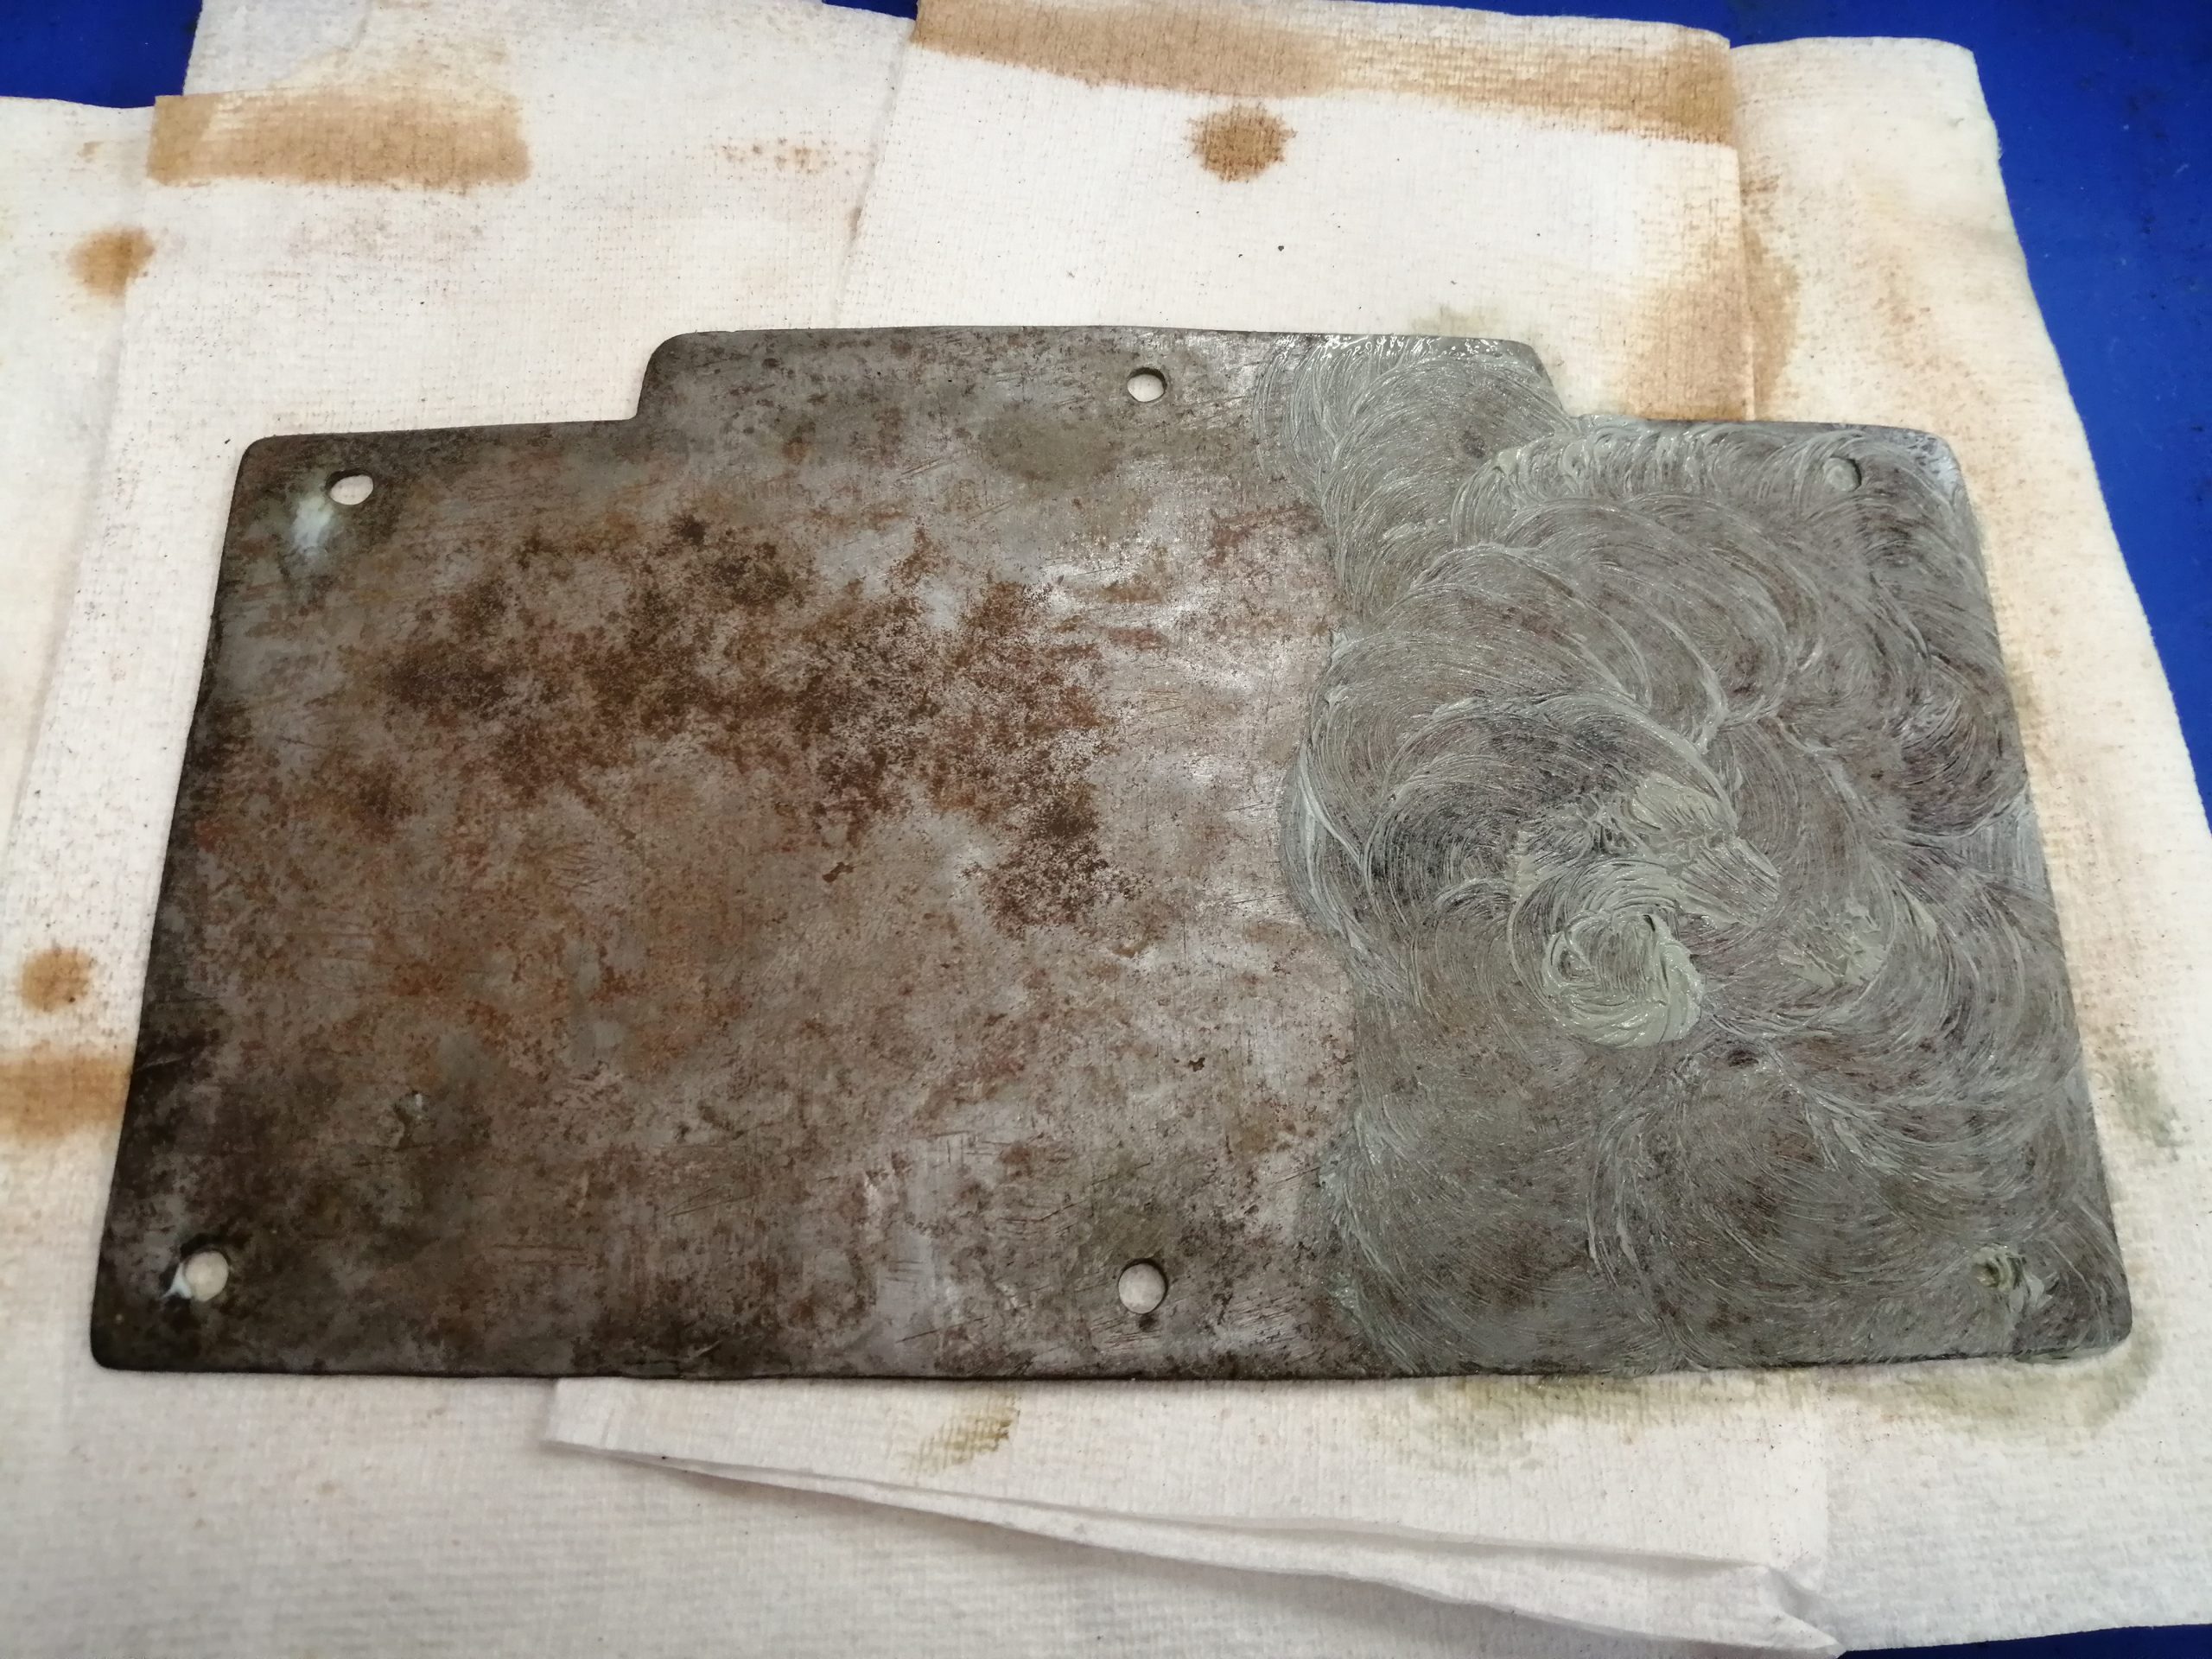
As the new corrosion had left a light texturing on the metal surface, PeekTM polishing cream was tested and produced a clean but not highly polished result, so this was used lightly all over the panel, and removed by swabbing with IMS. Finally, Renaissance waxTM was brushed sparingly over the surface to seal the panel, and the client was happy with the result. (Fig 7 and 8)
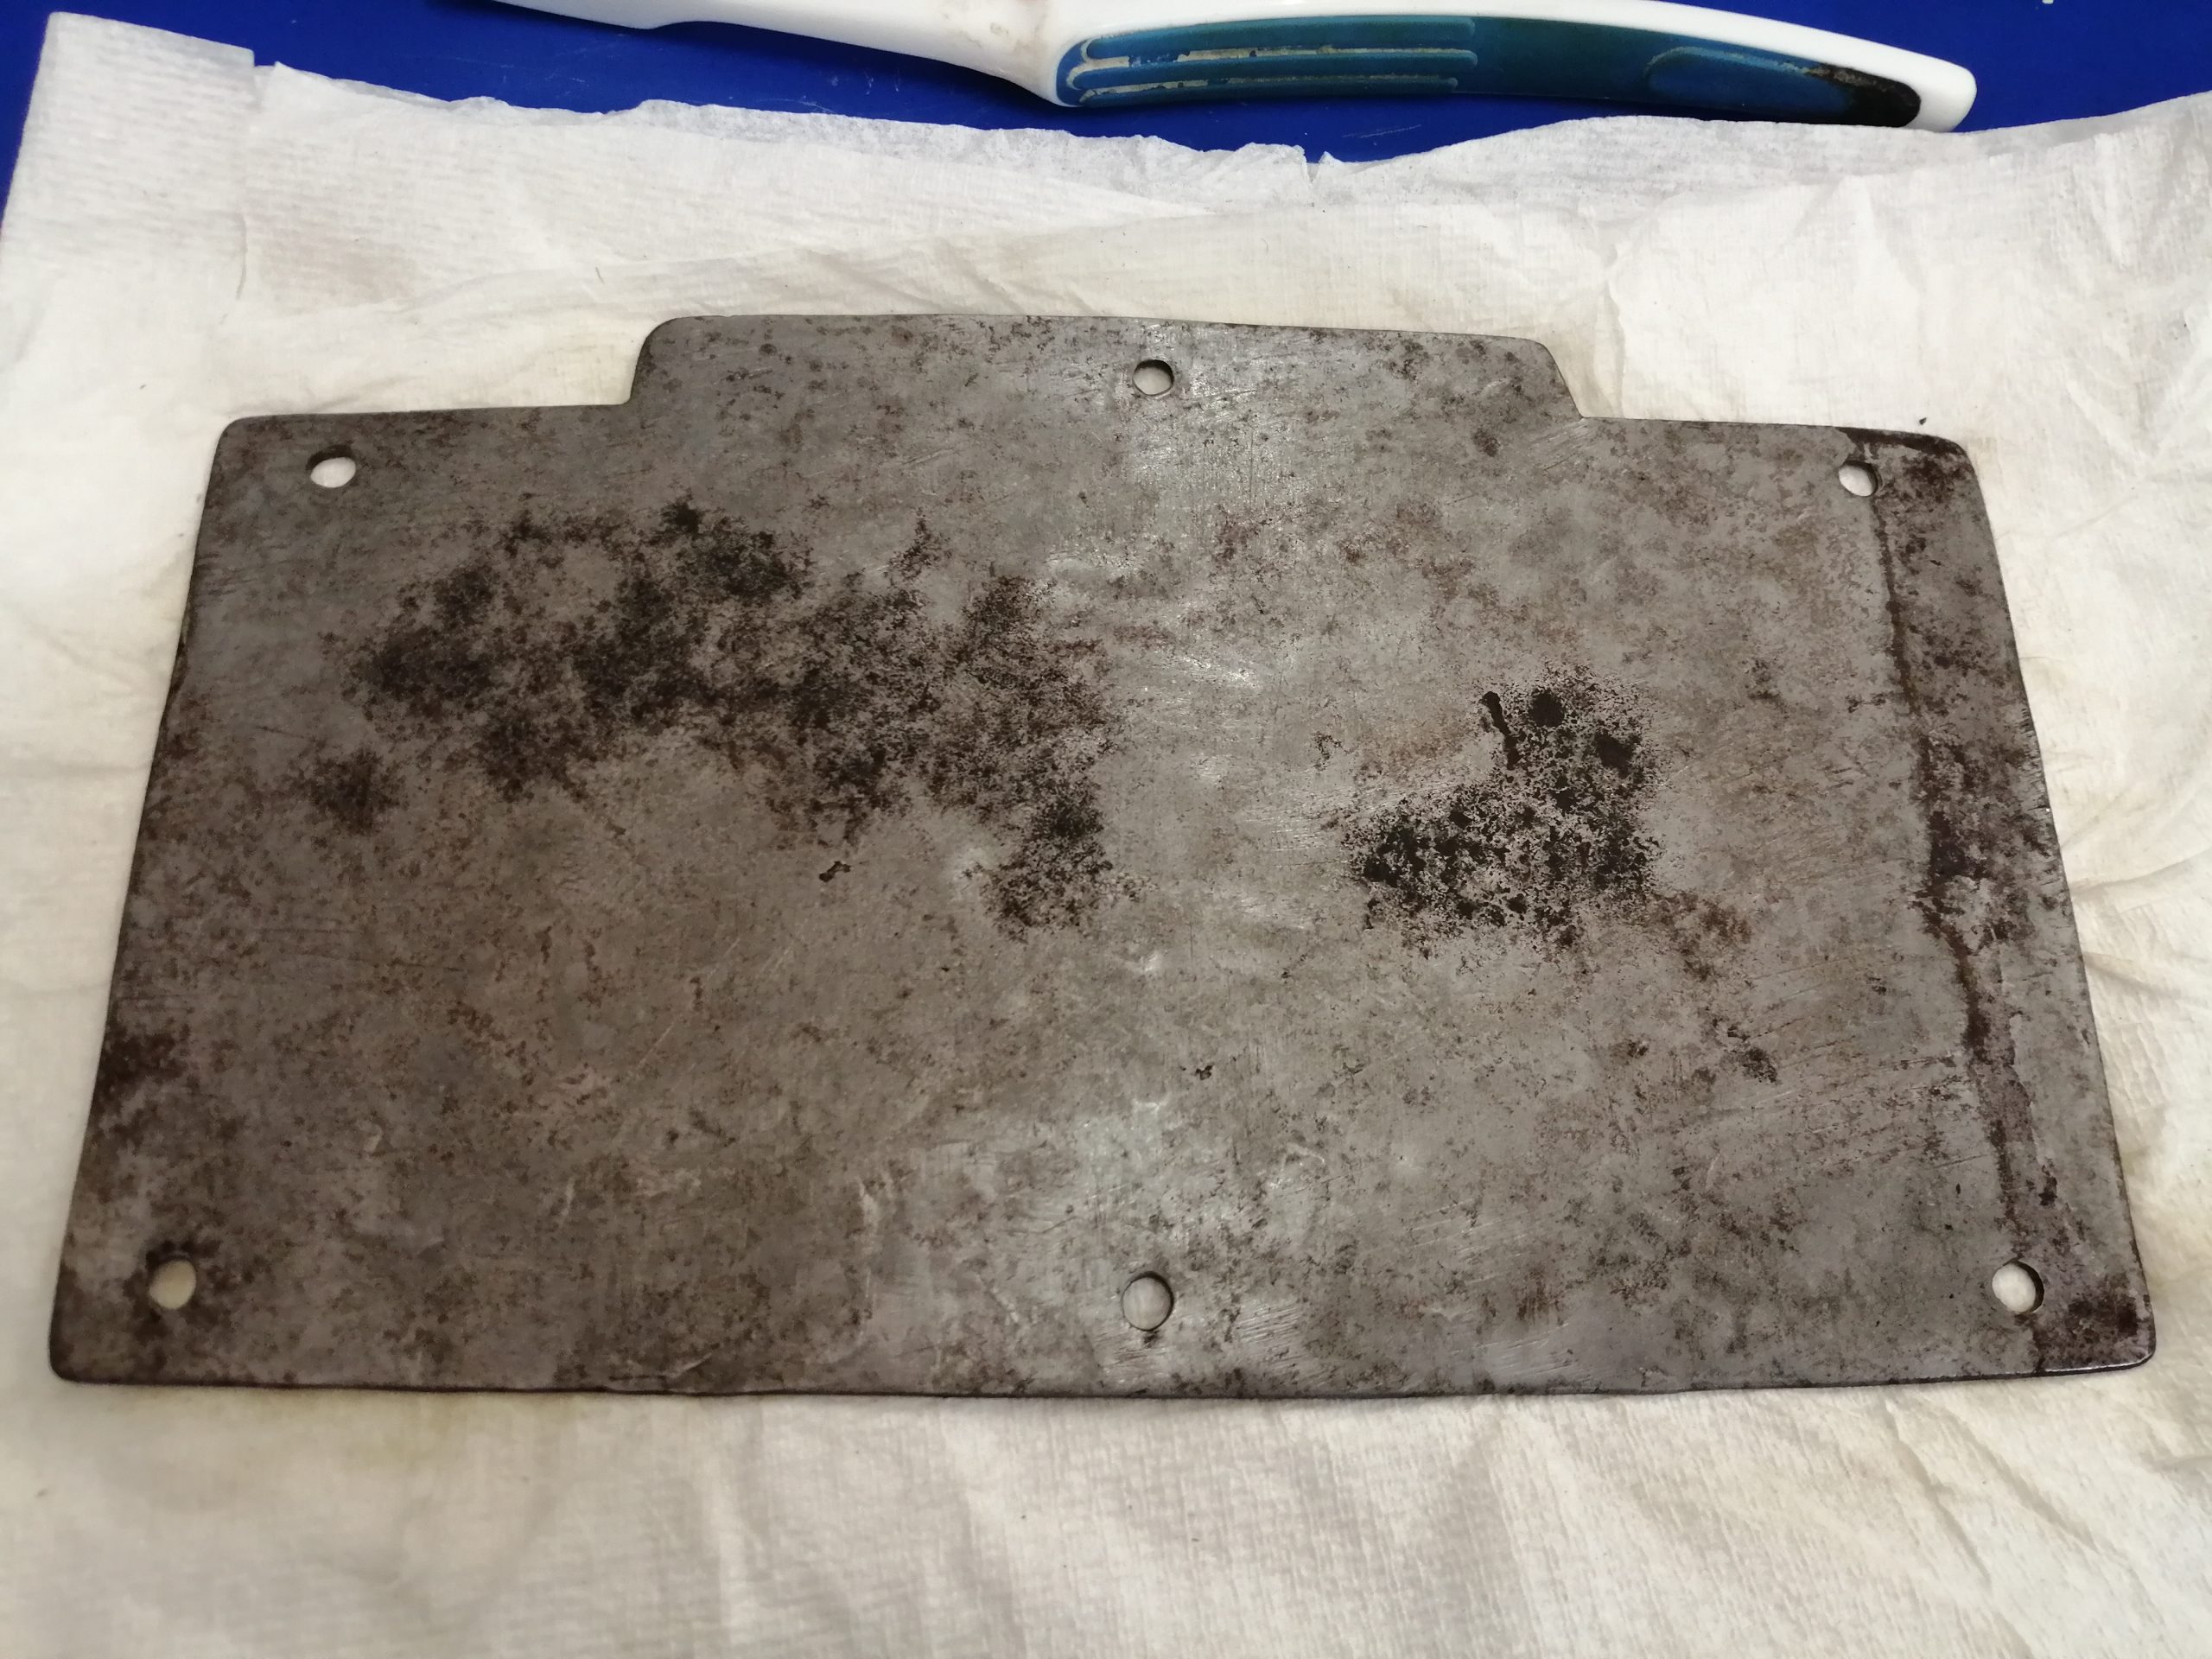
The new corrosion was removed from the exterior using the same procedure as before, minus the PeekTM treatment, as this chalky polish can prove difficult to remove from engraved and etched objects. Examination of the treated panels showed similarly that the new corrosion had developed mainly on previously damaged areas. Using the photographs as reference, I could see that this had resulted in small areas of new damage to the detailed etching. (Fig 9)

Once most of the new corrosion had been removed from the exterior, I returned to the affected areas with my trusty Optivisor for some close-up scalpel cleaning, using a blunt scalpel and clock oil as a lubricant. (Fig 9a)
Apart from a few small areas which had suffered new damage to the etchings, the treatment had achieved the aim of removing accumulated residues and corrosion, and for the most part the exterior was returned to its condition before the damage occurred.
Interior
The interior of the casket showed no signs of the powdery orange corrosion which had been evident on the exterior. However, there were some small areas of concern, which would need to be treated to avoid development of active corrosion.
The interior surfaces were mainly bare metal which had darkened with age, and contained a variety of surface textures which could react in different ways to any treatment applied. For this reason, I decided to use a localised tannic acid treatment only on the areas of concern. Tannic acid reacts with iron corrosion, to form ferric tannate, a dark film which is considered to be stable and would blend in well with the existing surface colour.
Referring to the CCI notes on tannic acid treatment, I made a 10% tannic acid solution, in de-ionised water with 5% IMS and 1% phosphoric acid, and tested this new solution, along with a solution which was a year old, on steel tokens.
The reaction produced by the older solution was slower, and more controllable than the new solution, enabling me to monitor the darkening of the surface more easily. The solution was heated to approx. 500 then applied sparingly with a fine brush, only to the areas affected by new corrosion. The solution was not allowed to dry completely as this would have resulted in a shiny surface, so when the area had blackened, the solution was swabbed away. (Fig 10.) I found that in some areas I needed to reapply the solution more than once to achieve a satisfactory reaction, and felt that this method was preferable to the faster acting solution as it was more controllable.
Locking Mechanism
Finally, an assessment of the locking mechanism in the lid revealed that some powdery corrosion had developed, and the same waxy substance which was evident in the interior was also present here. (Fig 11) The substance had probably been applied in the past as protection, however in time it had hardened and begun to degrade, attracting dust which in turn would attract moisture leading to corrosion. After discussion with the client, it was decided that leaving this coating in place would be detrimental to the long term stability of the object. In addition to the danger of encouraging corrosion, it was also unlikely to be an original feature and was impeding the locking mechanism, which in time might seize up.
Initial mechanical cleaning with a scalpel dislodged some of the residue, however as some parts were difficult to access, I decided to test a corner with white spirit and a bristle brush. (Fig 11a) This method was more successful in softening the hardened layers of wax, however was still time consuming, so I needed a method of soaking the entire interior of the lid to speed up the process. As there were no organic elements to the lid of the casket, I decided that soaking in white spirit would not be detrimental to the object.
I set the treatment up in the fume cupboard, and supported the casket under the body and hinges, with the lid in a downward position which allowed the locking mechanism to be easily accessed. The interior of the lid was gently soaked with white spirit using a wash bottle, then intermittently agitated with a bristle brush, loosening most of the wax making it possible to wash away the residues. The remainder of the wax was removed with a 1:10 VulpexTM to white spirit solution brushed with a bristle brush. As VulpexTM is strongly alkaline, great care was taken to wash away all the residue with white spirit.

The Final Stage
Before applying the protective wax coating, the exterior was gently rubbed with 0000 wire wool to remove loose powder rust and the casket was sealed in an airtight container with the correct amount of SilicagelTM over a weekend to make sure it was completely dry. One coat of Renaissance WaxTM was sparingly applied all over the box, then lightly buffed with tissue.
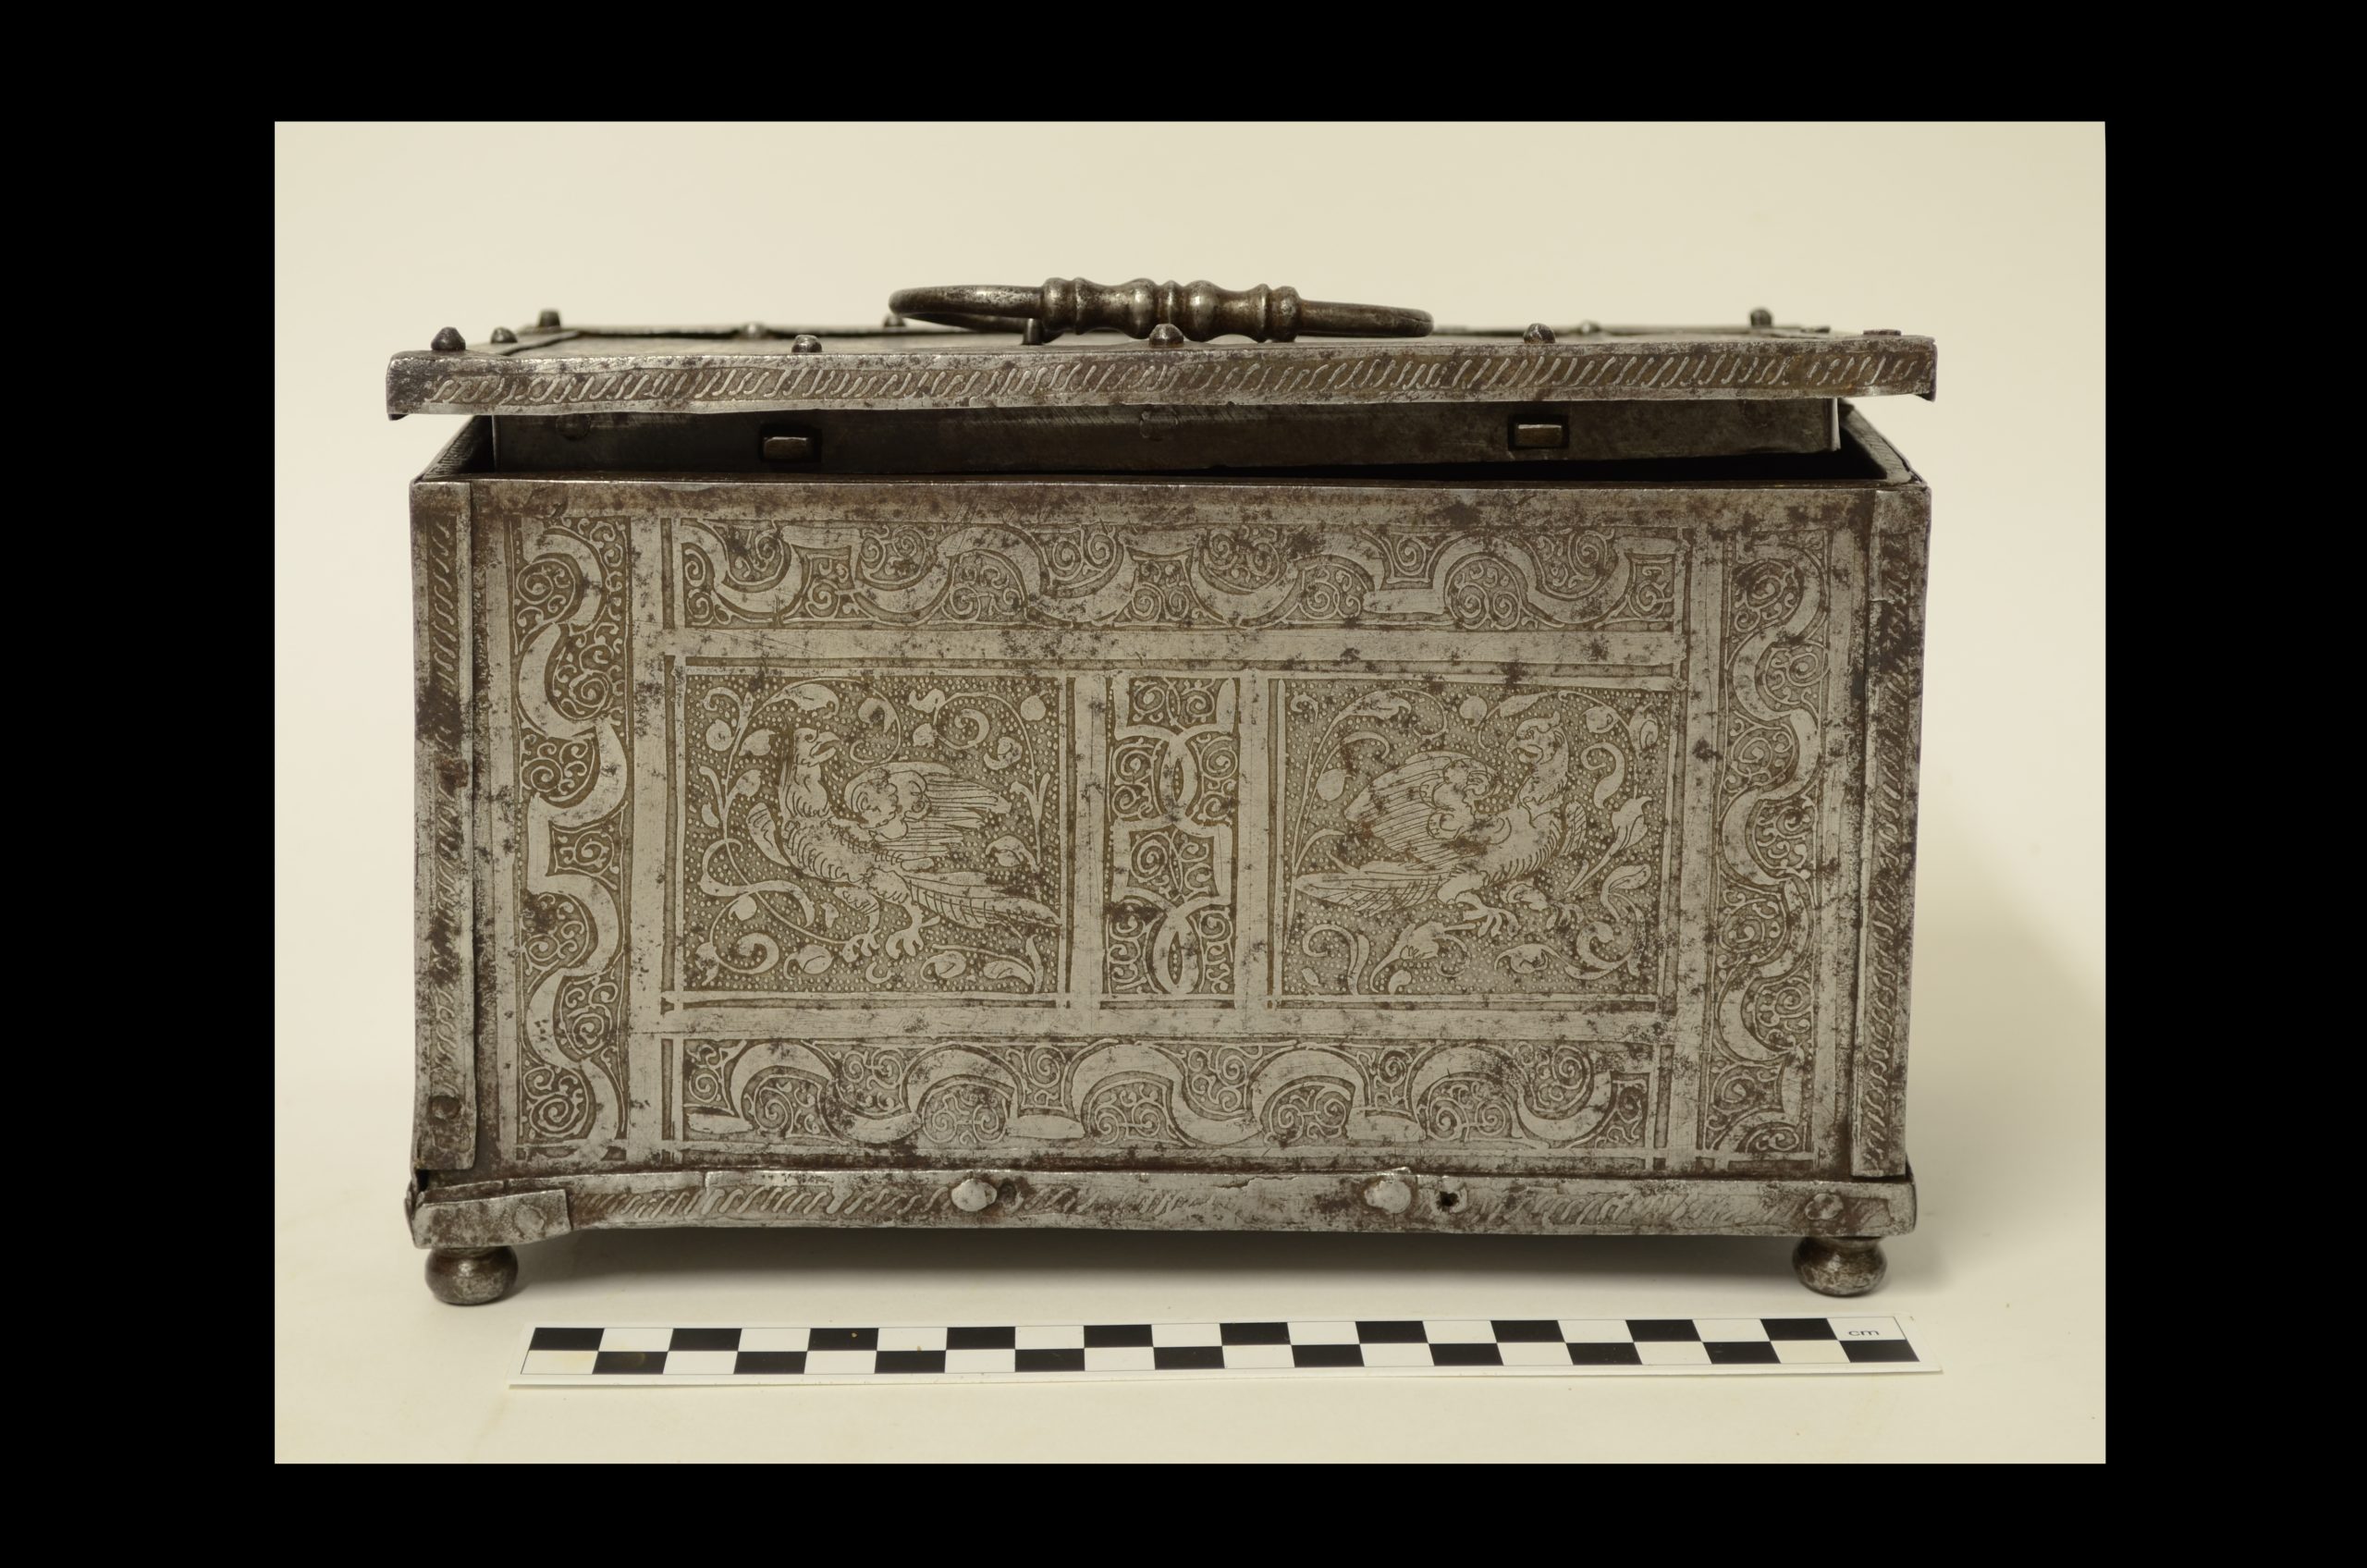
For the main part, I was able to return the casket to its prior condition, with only some small areas where the corrosion had affected the delicate etching, and the client was happy with the results.
This project provided interesting challenges involving a variety of surfaces, also enabling me to extend my knowledge of the analytical techniques used in conservation science. It demonstrated the critical importance of testing before treatment, and taking detailed notes, and a good relationship with the client also allowed a constant dialogue. I was very happy that Tim, being a conservation professional, was pleased with the finished result. (Fig 12)
Figures
Fig 1 and 2. Iron casket prior to exposure to water. Showing the exterior and the locking mechanism in the lid.
Fig 3. Casket showing the result of exposure to water and the extent of the corrosion.
Fig 4. Spectra from XRF analysis showing a high peak for Fe – iron, with only trace readings for other metals.
Fig 5. X-ray photograph revealing areas of the locking mechanism which were difficult to access.
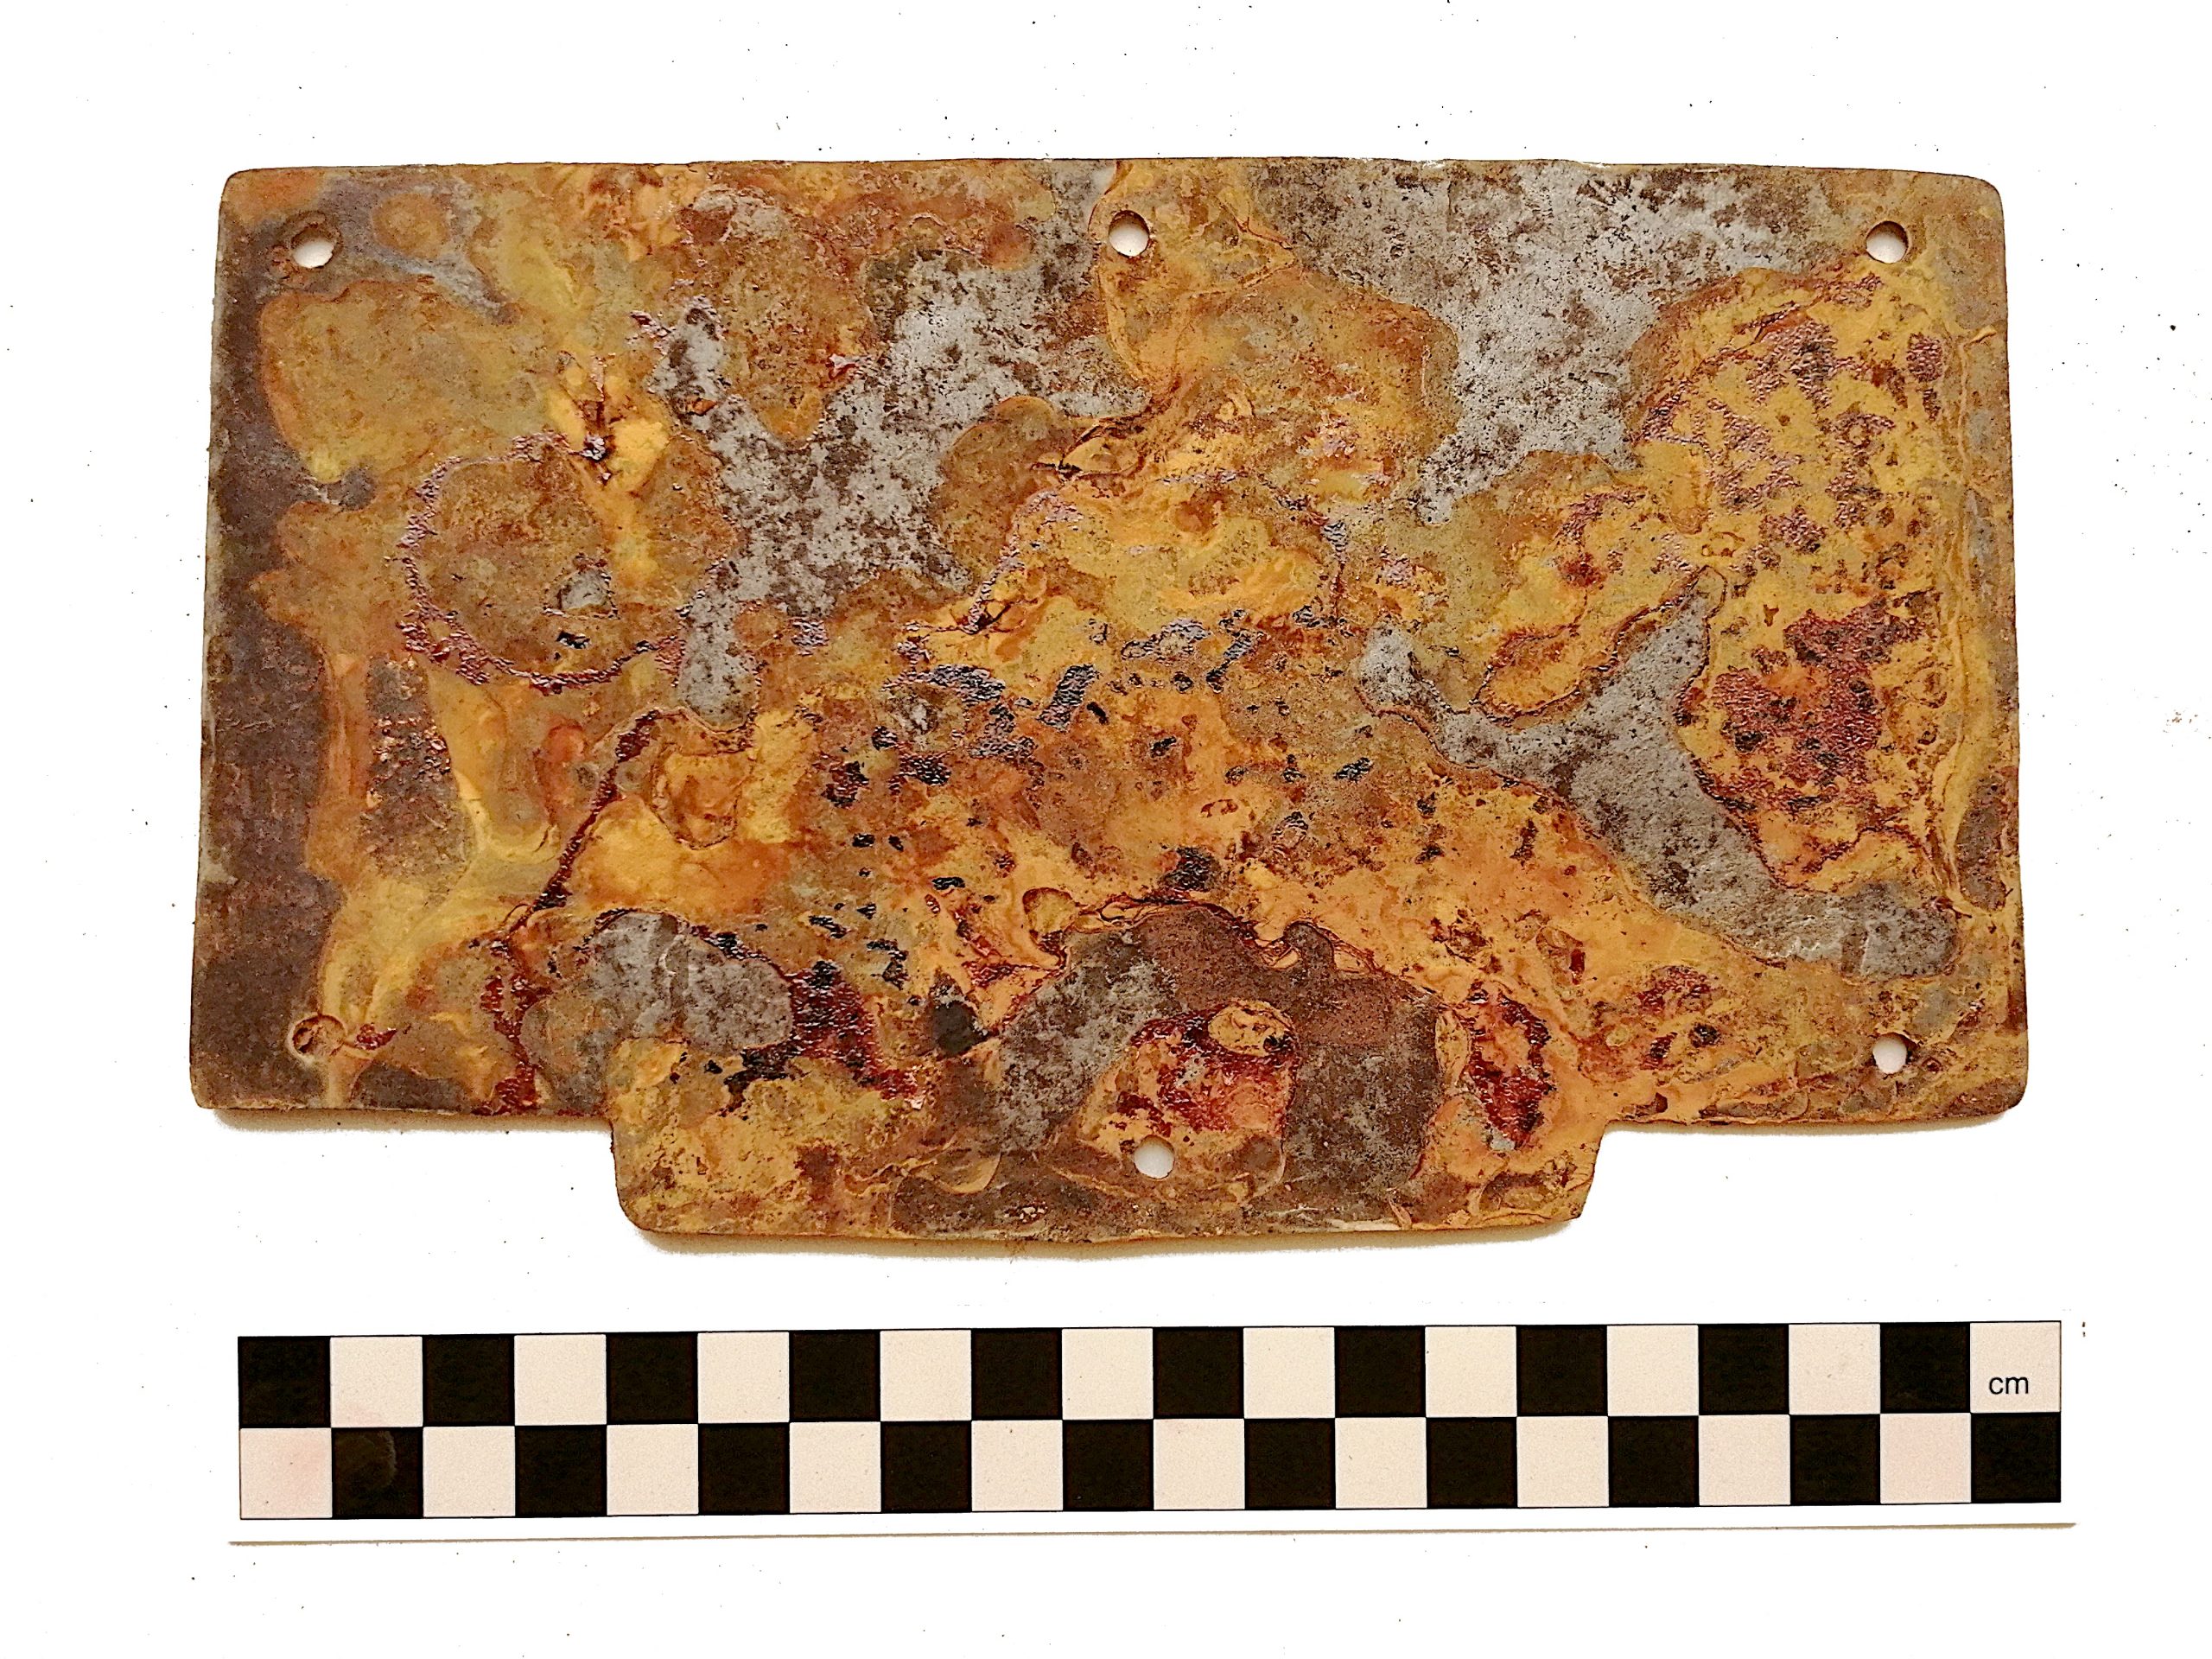
Fig 6. Interior panel which had been affected by corrosion.
Fig 7 and 8. Interior panel during and after the application of PeekTM polishing compound, showing the areas of black corrosion which were present before exposure to water.
Fig 9. Casket lid showing the result of mechanical cleaning to the right hand side.
Fig 9a. Scalpel cleaning with lubricant.
Fig 10. Application of the tannic acid solution to the interior of the casket.
Fig 11. Close up of an affected corner of the lid, showing light powder corrosion and degraded waxy residue.
Fig 11a. Initial testing for removal of residues from the locking mechanism with scalpel and bristle brush.
Fig 12. The final result showing the conserved casket.